Freenove Robot Dog Kit for Raspberry Pi
The Robot Dog Kit from Freenove is probably one of the more interesting things you will come accross all day. It is powered by the Raspberry Pi. You can find it on Amazon HERE (affiliate link). It has some really interesting features including:
- Facial recognition
- Live Video
- Ultrasonic Ranging
- Self balancing
- Programmable
This is the overview video from Freenove:
Keep reading for:
- Setup instructions
- Our demo video ( coming soon )
- Our own customizations and modifications ( coming soon )
- Unboxing video ( bottom of page )
Also, learn more about Freenove here:
Our Setup Instructions
This is a document that I put together while assembling the Freenove Robot Dog Kit for Raspberry Pi. I basically followed the official instructions and put the information together in a format that is easy for me. You should probably use or at least look over the official documentation from Freenove as it includes some extra details that I haven’t included.
- Client Working on Ubuntu 20.04
- See where I got tripped up
You can download the official instructions from Freenove here
Required parts that are not included:
- 2 lithium batteries without protection board: search “18650 3.7V high drain” on ebay
- Raspberry Pi (4B / 3B+ / 3A+ / 3B) ( other models may work with Wifi card and/or camera cable )
- Micro SD Card ( 16GB or more )
- Power adapter / cable
gpio readall
Raspberry Pi Setup
- Download Raspberry Pi imager
- Write Raspberry Pi OS to the SD card
- Keyboard and monitor
- Connect to network ( probably ethernet )
- Enable SSH: create “ssh” folder on SD card boot disk
- Insert SD card
- Find IP of Raspberry Pi
-
SSH to it ( pi/raspberry )
- Install remote desktop in case you want it on Windows
sudo apt-get install xrdbLaunch remote desktop from Windows
- type [WIN] + r
- type mstsc.exe
SSH to your Raspberry Pi. You can use either the IP or raspberrypi.local.
- See my other guide: How To Find IP Address Of Raspberry Pi
ssh pi@raspberrypi.localThe default password is: raspberry
Needed to enable booting into X windows and rebooted after that.
Launch the configuration utility:
sudo raspi-config- “1 Change User Password “
- “5 Interfacing Options”
-
“P3 VNC”
- Download / install VNC Viewer
I used the official version from RealVNC:
HERE
I’ve tried other clients but had trouble because they don’t support the newer security options that were enabled on the server.
- connect to your Raspberry Pi’s IP on port 5900 using pi/raspberry ( or whatever password you changed it to )
Launch the configuration utility:
sudo raspi-configSelect these Options
- “7 Advanced Options”
- “A5 Resolution”
- “proper resolution ratio ( set by yourself)”
- OK
- Finish
Fix scaling on VNC viewer:
- Properties
- Options label
-
Scaling
- enable wifi ( through ssh or GUI )
Charging
– buttons and LEDs on the robot board – – image here —
To charge:
- 2 batteries must be installed ( not just 1 )
- turn off S1 and S2 switches
- plug in USB C cable ( 5V 2A or above )
Note:
- The D3 LED will stop blinking and stay steady when charging. It will turn off when charged.
- It is ready for charing when all all power indicator LEDs are off ( indicates batteries lower than 5.6V ).
Setup Python Libraries
WARNING - Use VNC or there could be errors during installation ( according to the manual ).
Clone the Freenove Robot Dog GitHub Repo:
git clone https://github.com/Freenove/Freenove_Robot_Dog_Kit_for_Raspberry_PiCheck Python version, set it to 3 if it isn’t already:
python
cd /usr/bin
sudo rm python
sudo ln -s python3 python
python
Enable the camera using the GUI based config tool:
- Menu, Preferences, Raspberry Pi Configuration
- enable camera and I2C
- OK
- No
Set I2C Baud Rate
Edit this config file:
sudo nano /boot/config.txtChange this:
dtparam=i2c_arm=on, To this:
dtparam=i2c_arm=on, i2c_arm_baudrate=400000Run Setup
Run the setup program:
cd ~/Freenove_Robot_Dog_Kit_for_Raspberry_Pi/Code
sudo python setup.py- If this fails, just re-run it again. This is supposedly common due to network issues.
Reboot after setup has completed sucessfully:
sudo rebootAssemble Robot ( part 1 )
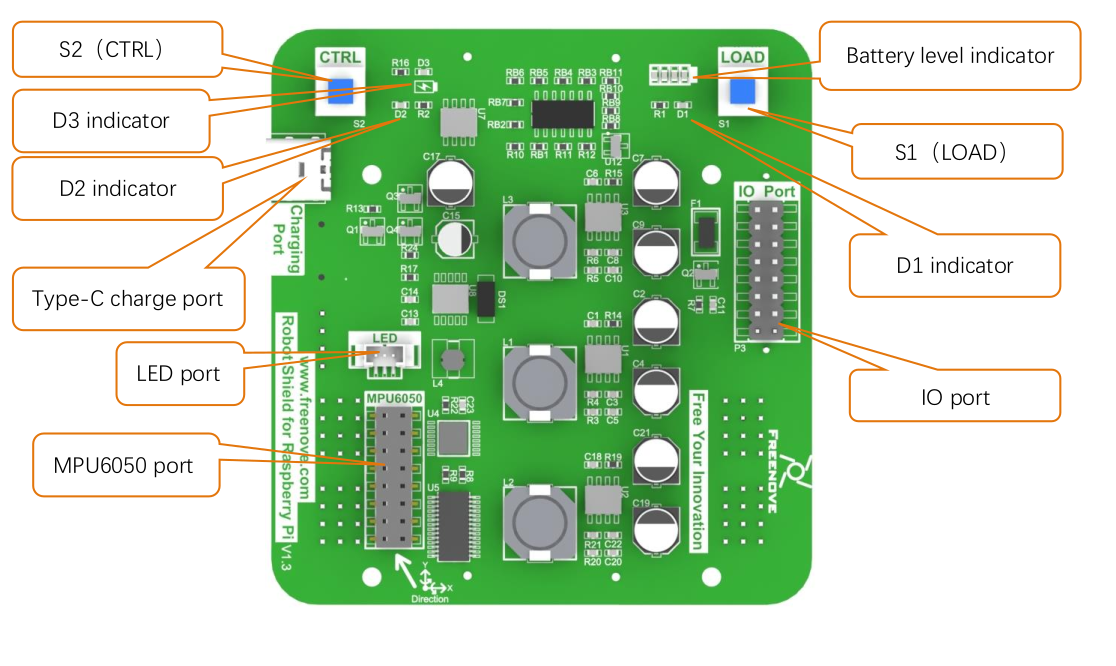
| Robot Shield board | It requires two 18650 3.7v batteries. It has charger function. |
| S1(LOAD) Switch | It mainly controls the power supply of servos, buzzer, ultrasonic module and LED module. The D1 indicator will light up when S1 is pressed. |
| S2(CTRL) Switch | It mainly controls the power of chips such as PCF9685, ADS7830 and Raspberry Pi. The D2 indicator will light up when S2 is pressed. |
| Type-C port | It is used to connect cable for charging. It only works when S1 and S2 are turned off. |
| LED port | It is used to connect LED module which is controlled by Raspberry Pi. |
| MPU6050 port | It is used to connect MPU6050 which is controlled by Raspberry Pi. |
| Battery level indicator | It consists of four LEDs. When the battery power decreases gradually, the LEDs will get dimmer gradually until it’s turned off. |
| IO port | It is used to connect shield with Raspberry Pi conveniently. |
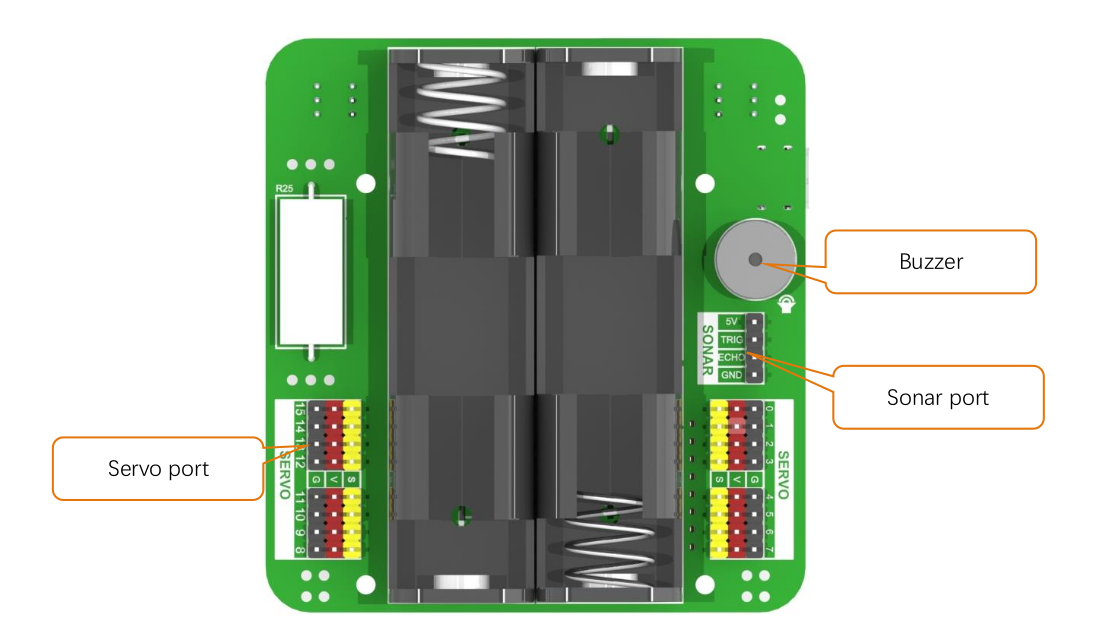
| Servo port | There are 16 servo ports with control accuracy of 0.09 degrees. |
| Sonic module port | The interface of HC-SR04 Ultrasound Module is provided. |
| Buzzer | It is directly controlled by raspberry pi, which is turned on at high level and off at low level. |
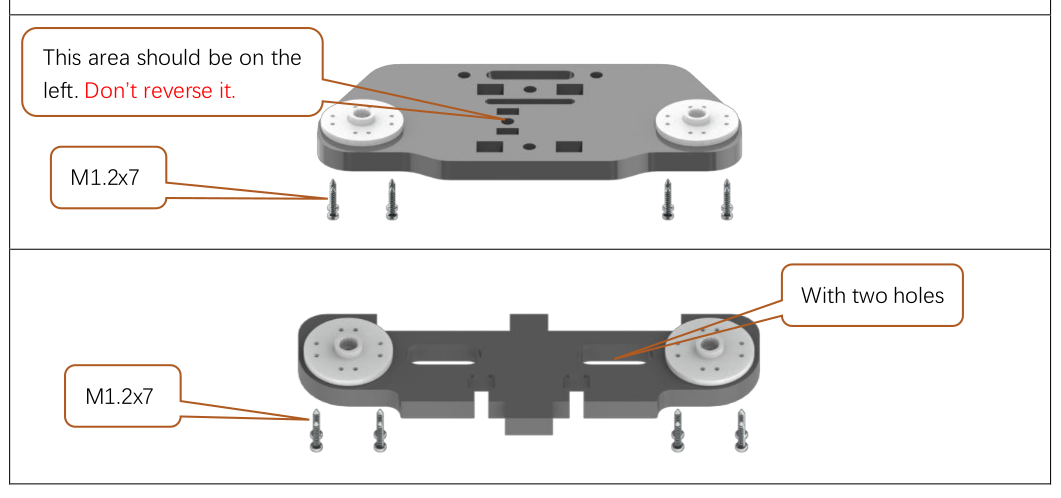
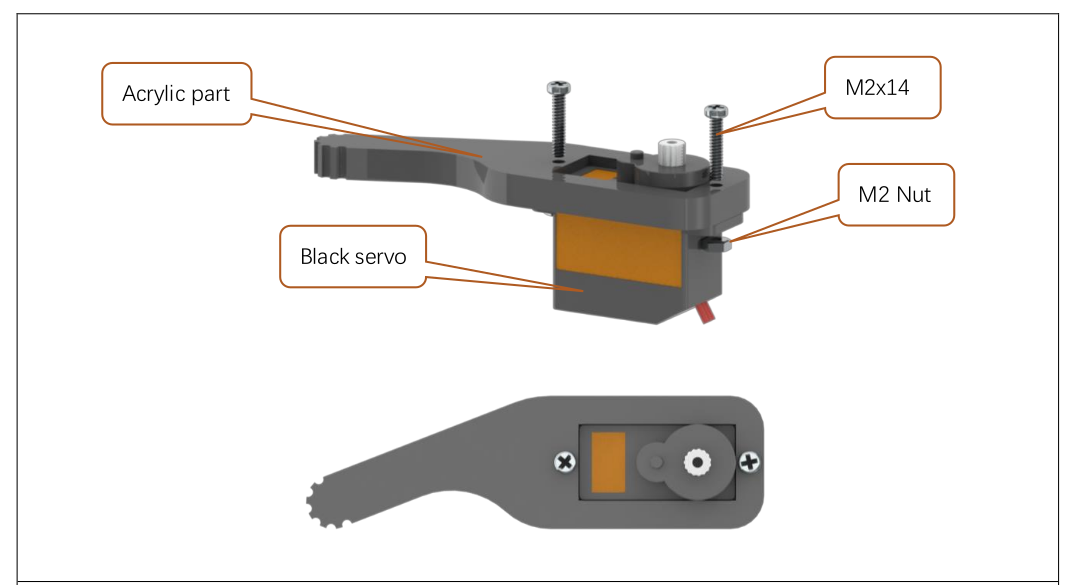
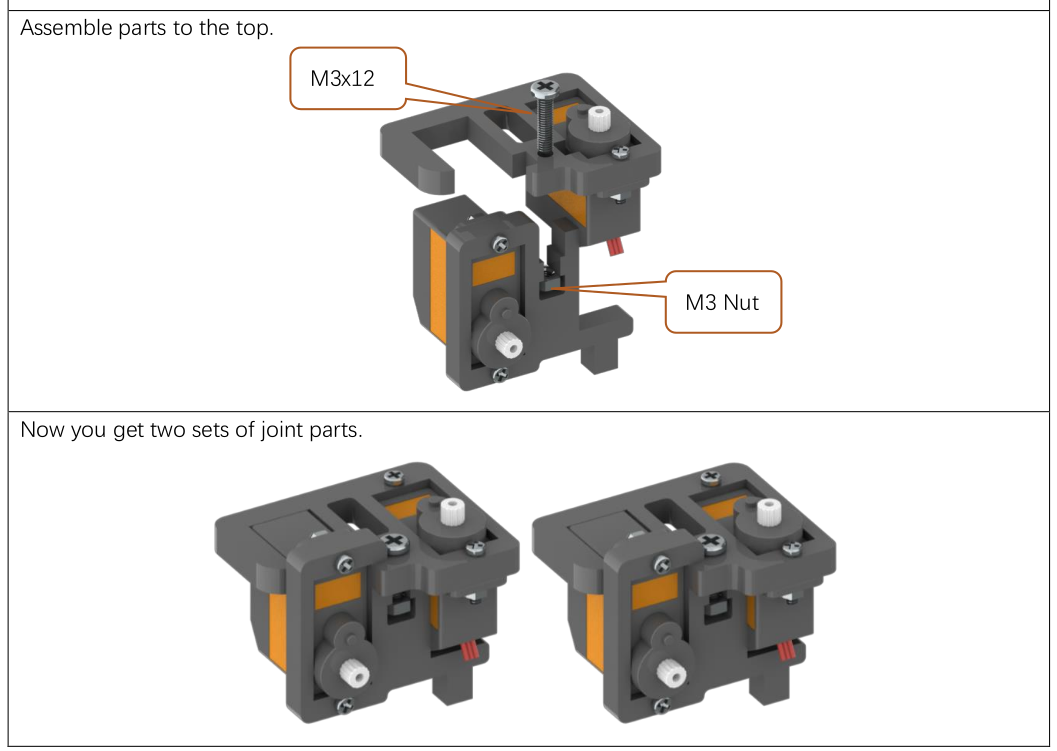
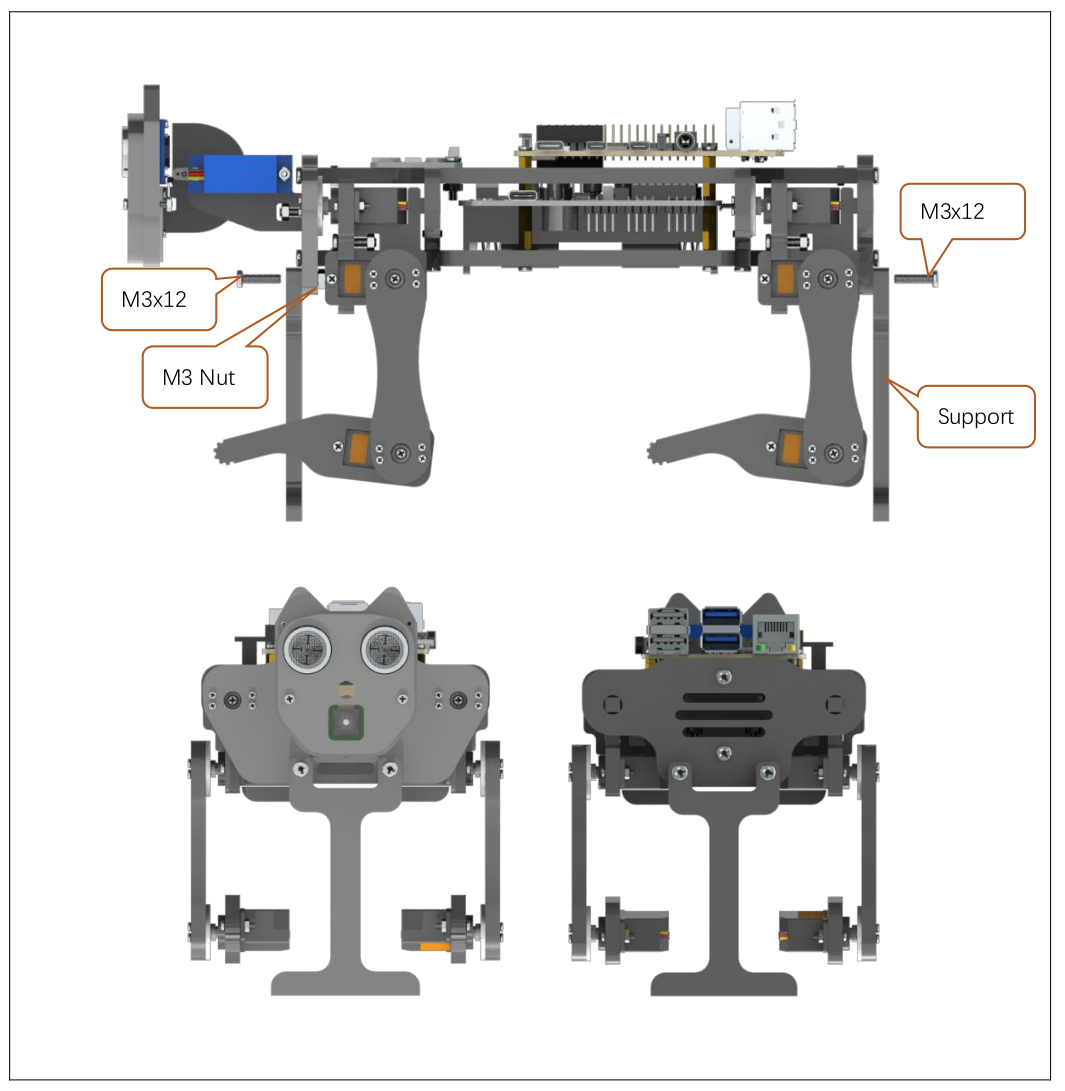
WARNING - Make sure you use the correct screws and other parts as labeled in the diagrams. For example, don’t just assume that you should use the screws from the same pack as the servo motors to connect the plates to the arms. I did this and broke a couple of screws because I didn’t verify that they were the correct type.
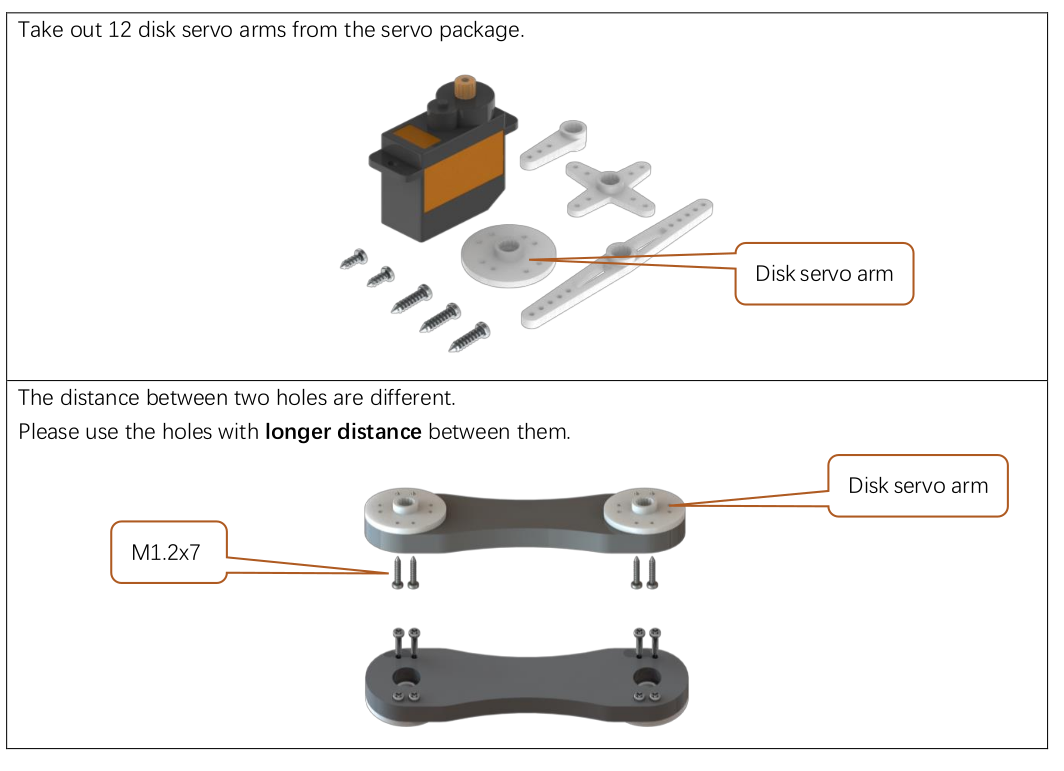
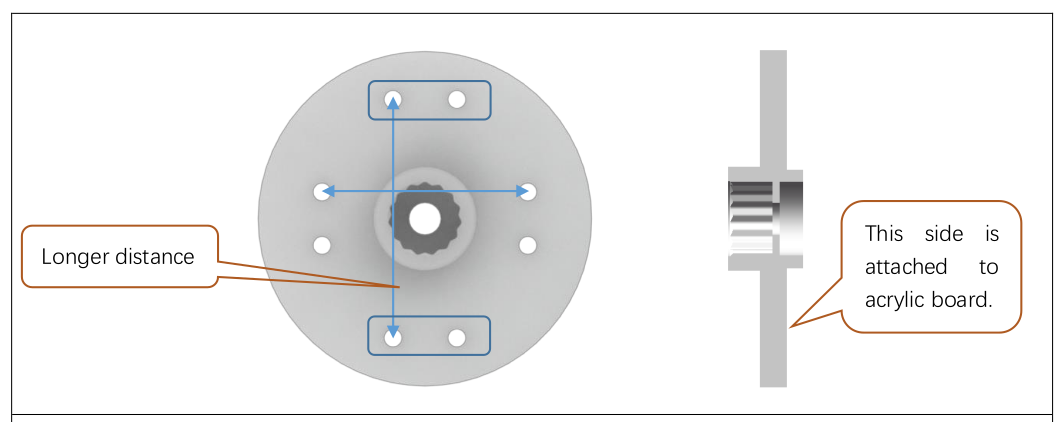
- Install the disk servo arms. Note that the distance between the holes will be different. Use the holes with the longer distance between them.
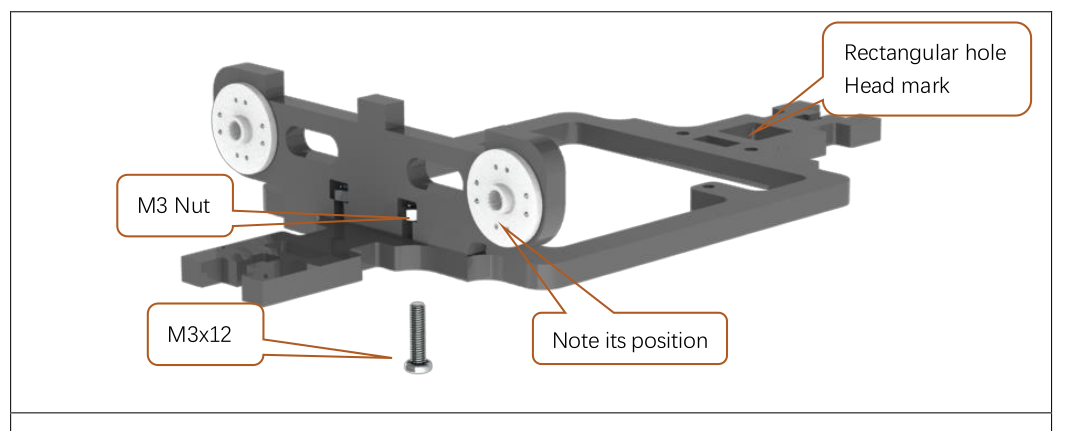
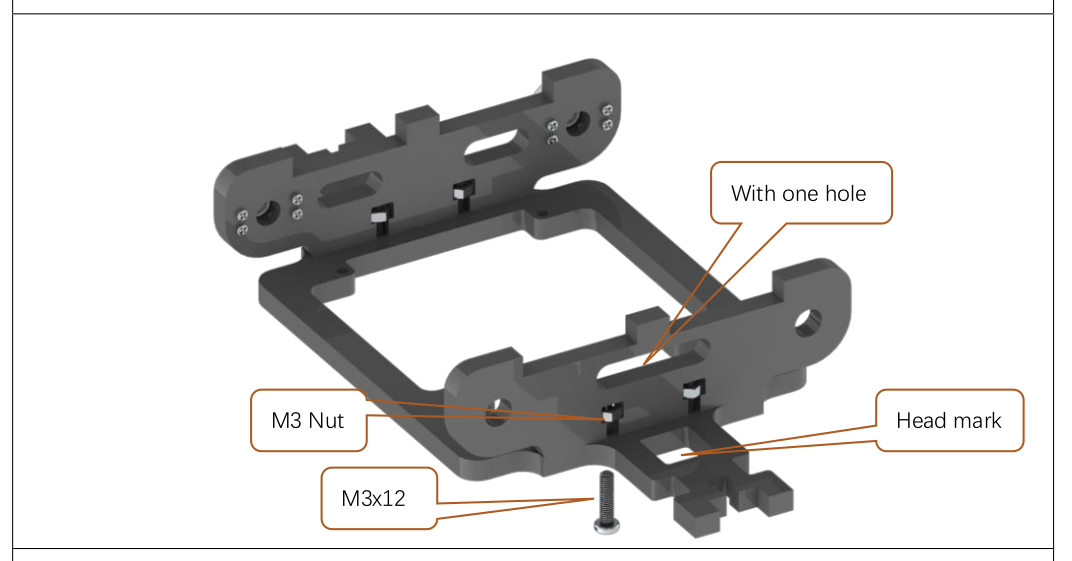
- Connect some more plates.
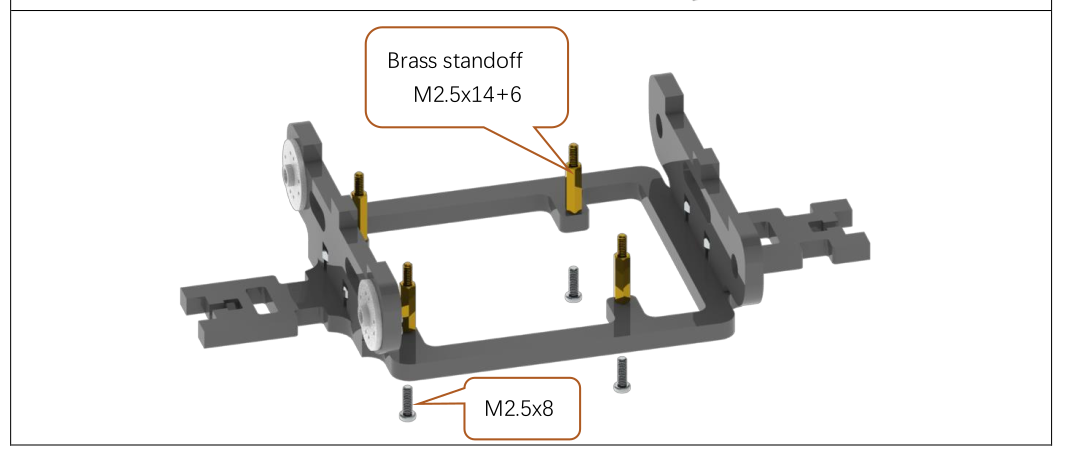
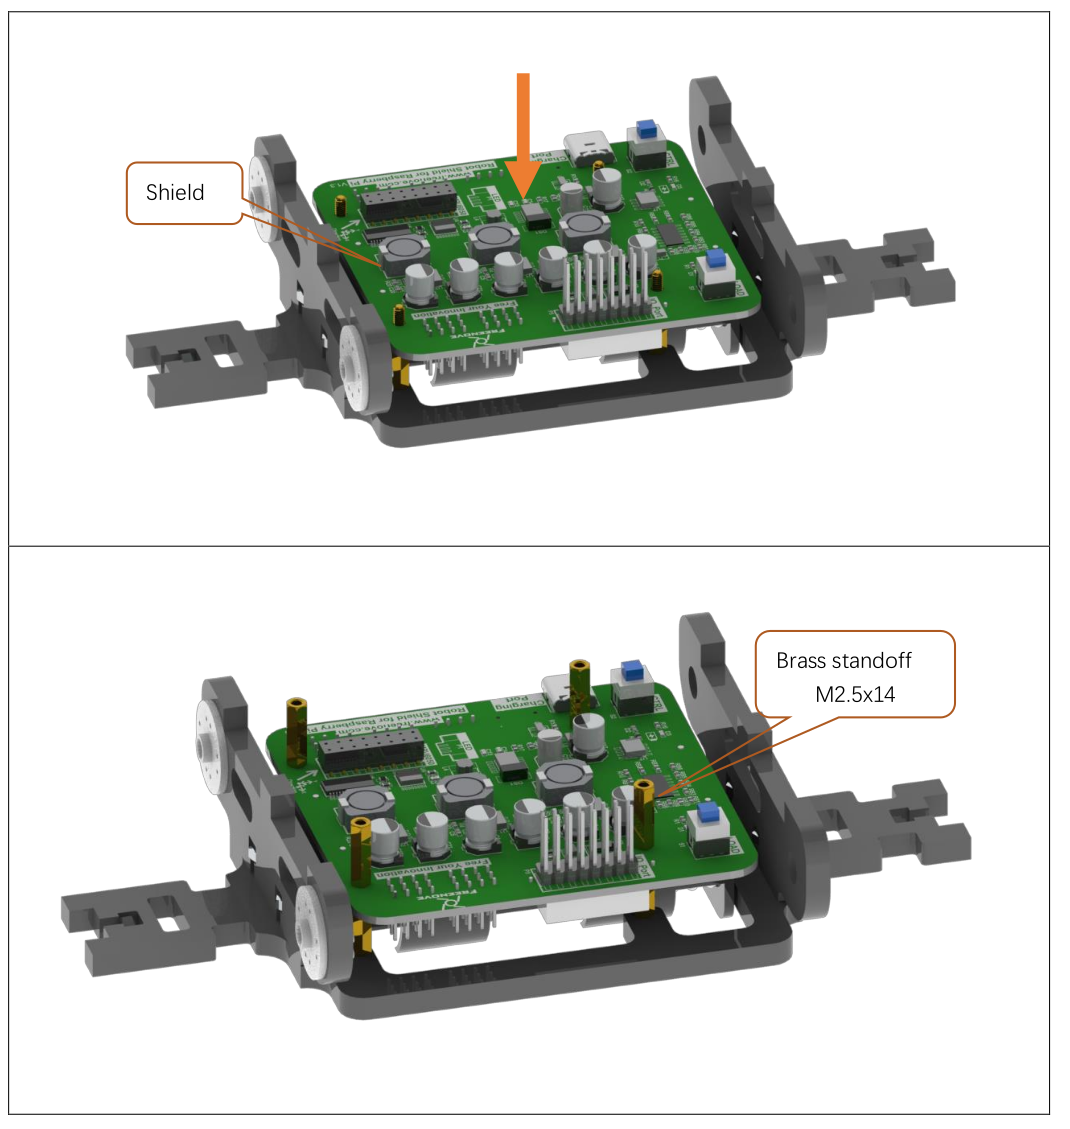
- Install the body bracket and brass standoffs.
- Install the robot shield.
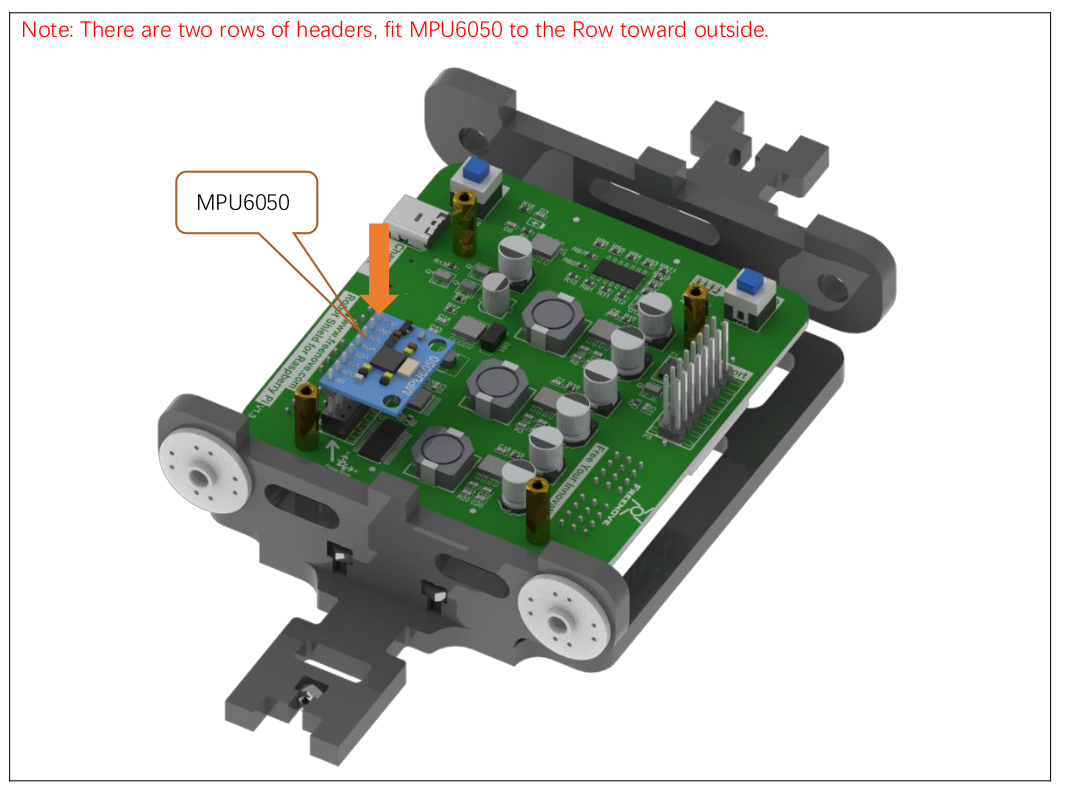
- Install MPU6050.
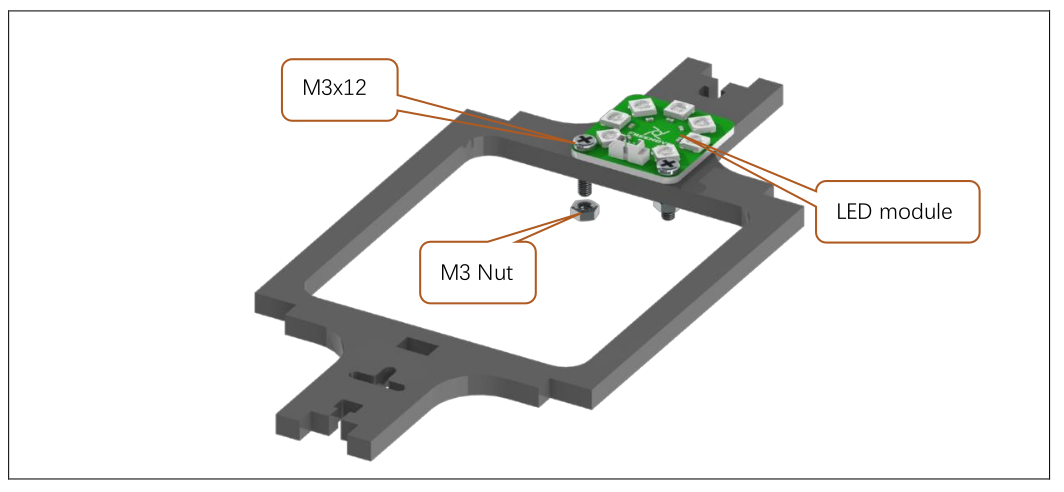
- Install the LED module.
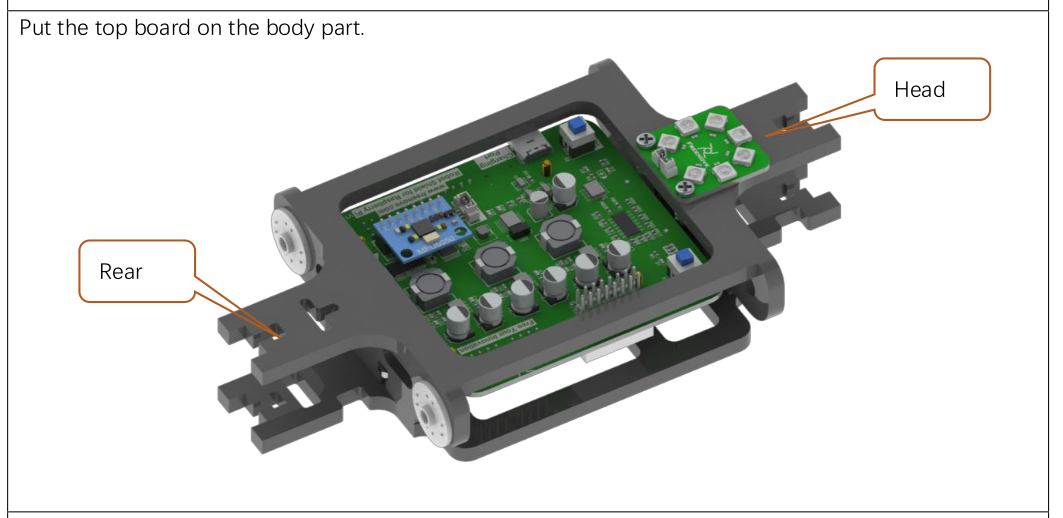
- Install the top board.
- Connect the LED module to the robot shield using the 3 pin cable.

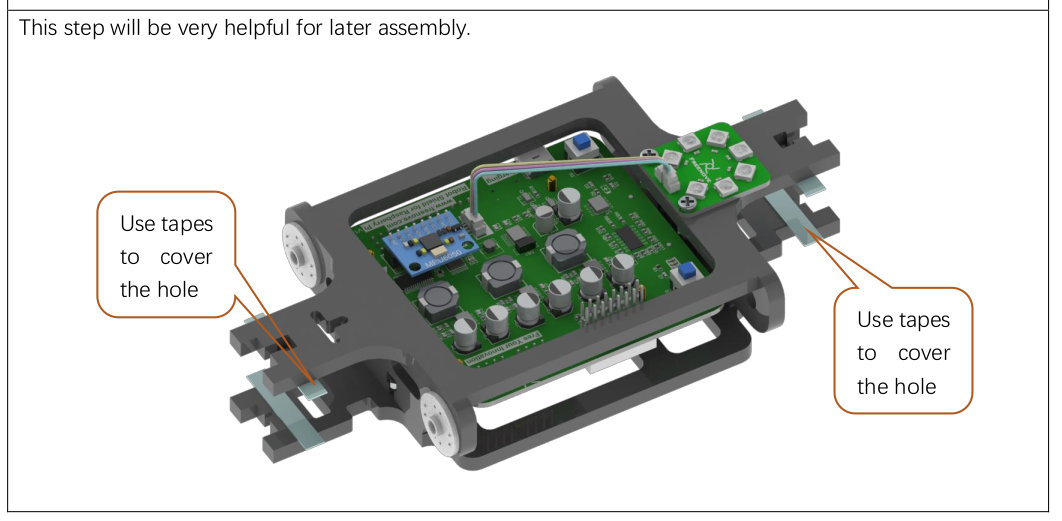
- Cover holes with tape.
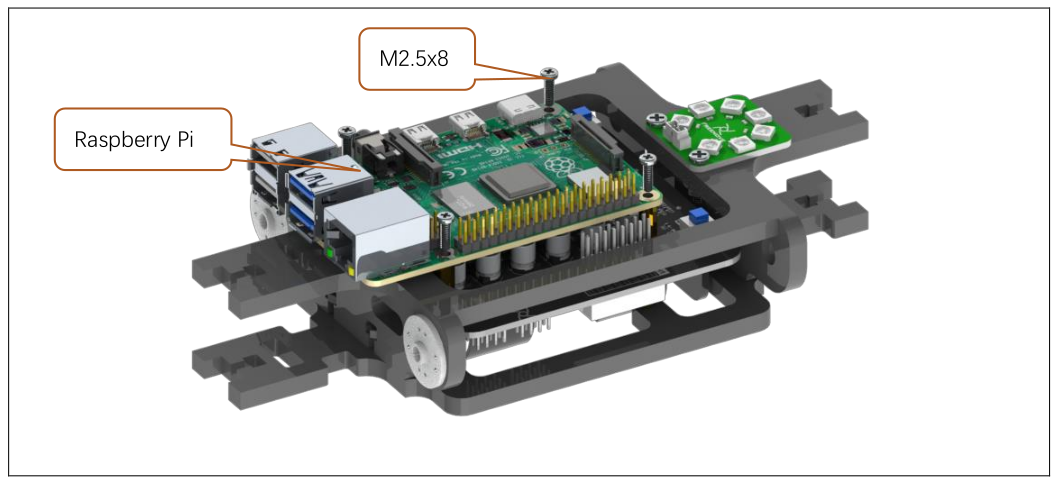
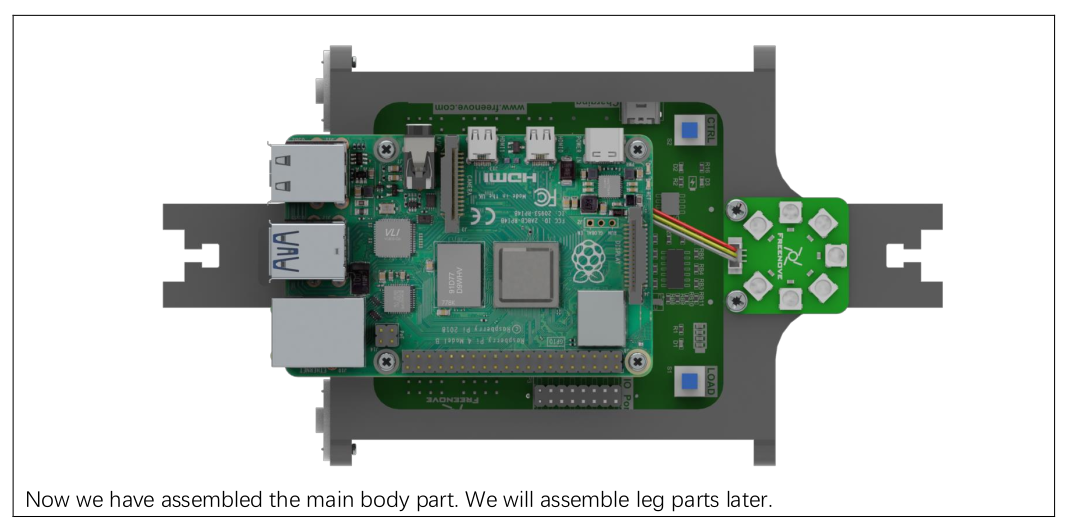
- Install the Raspberry Pi
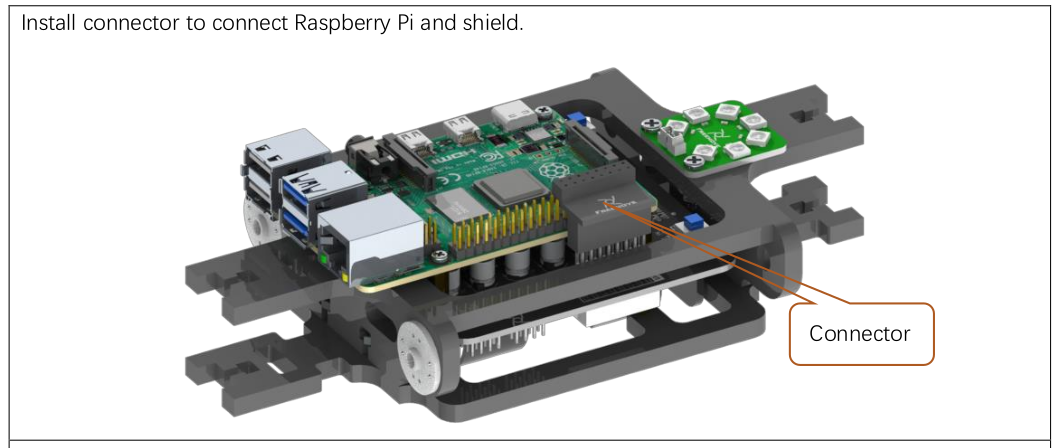
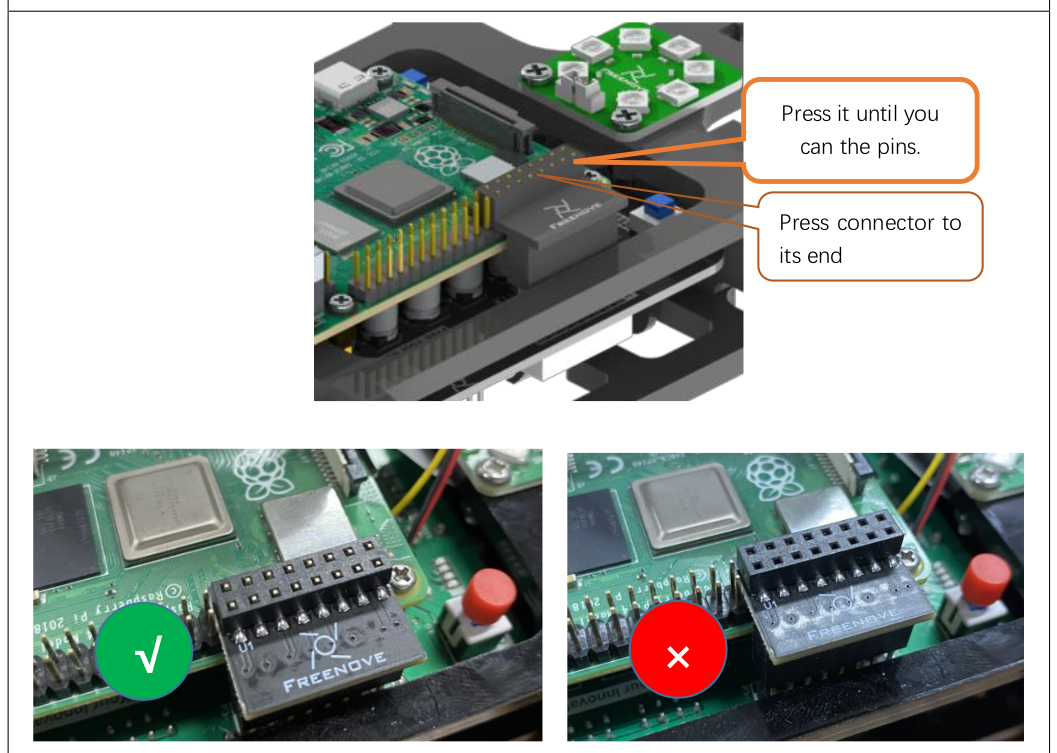
- Install the connector. Push until you see the pins come through.
- The main body is now assembled.
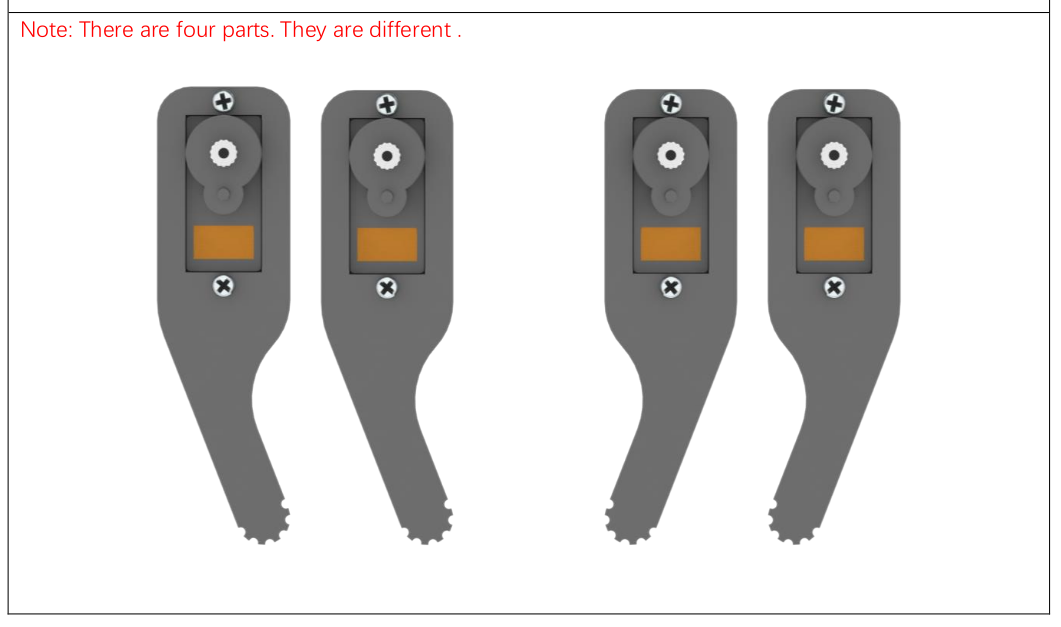
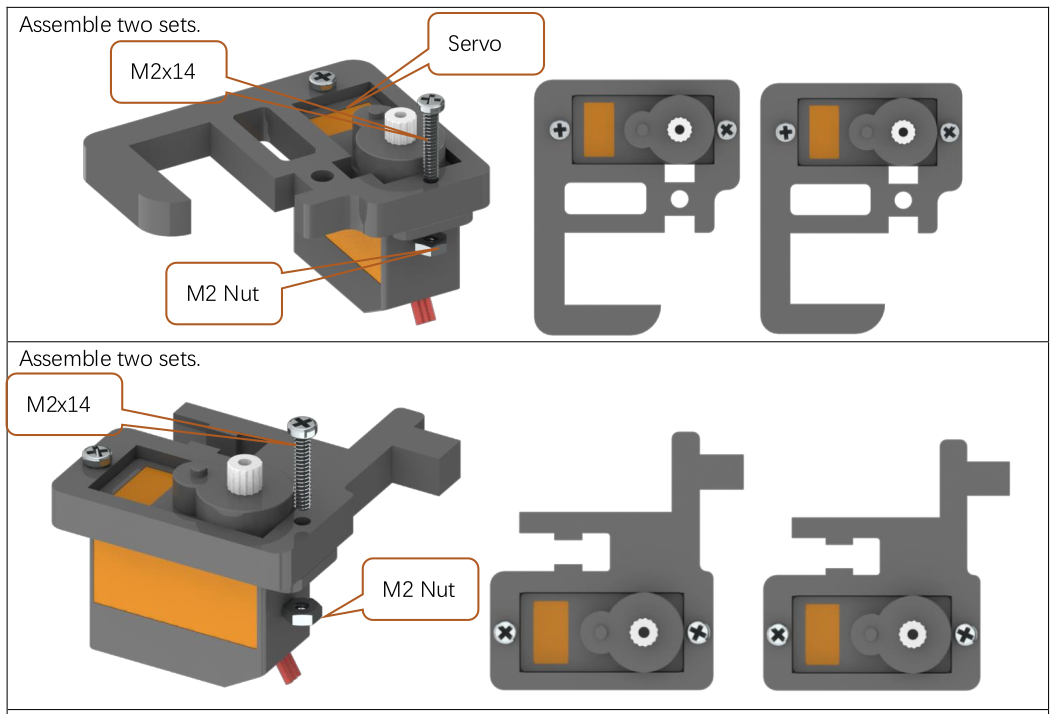
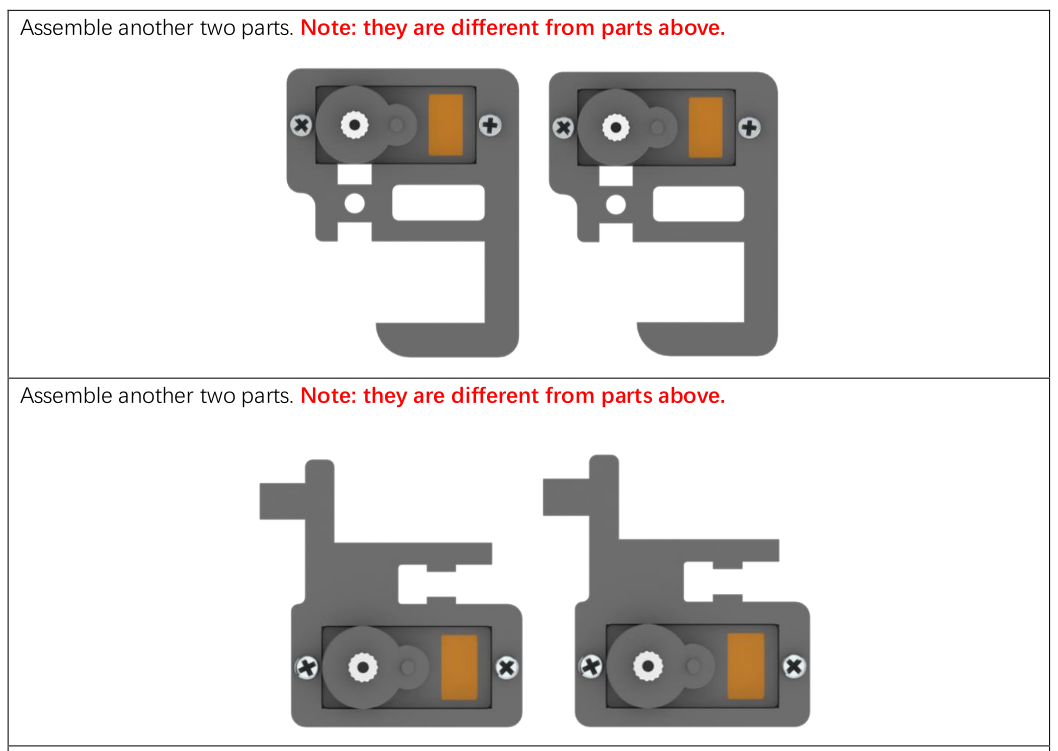
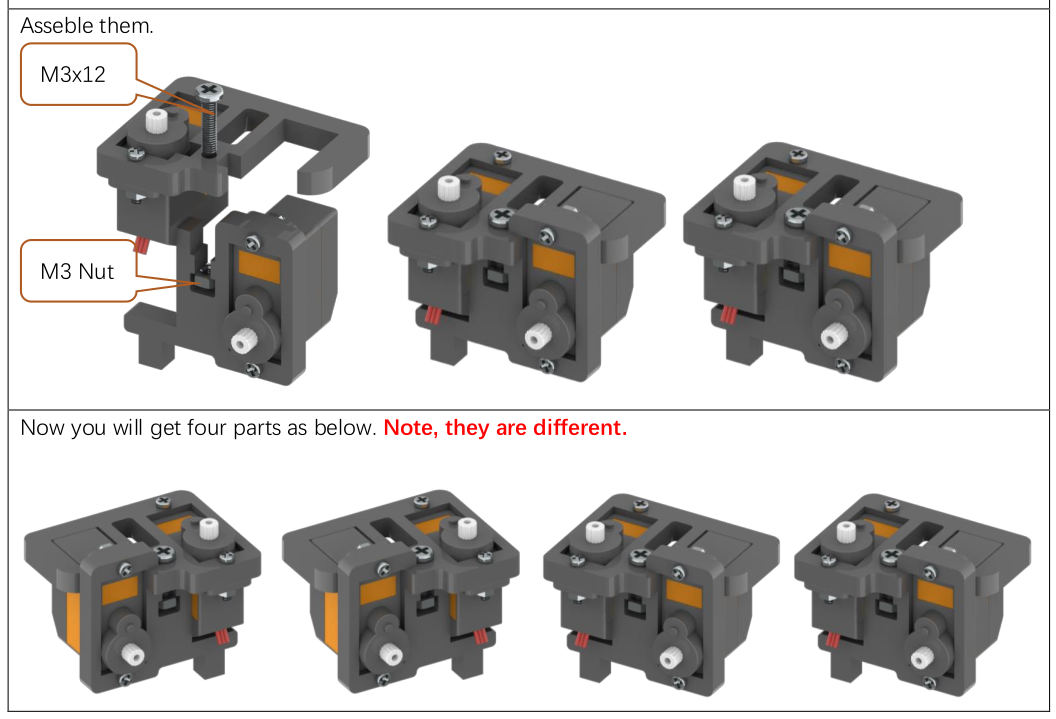
- Assemble multiple sets of joint parts.
Run Servo Program
- Connect the servos to random ports
- 12 black servos
- 1 blue servo
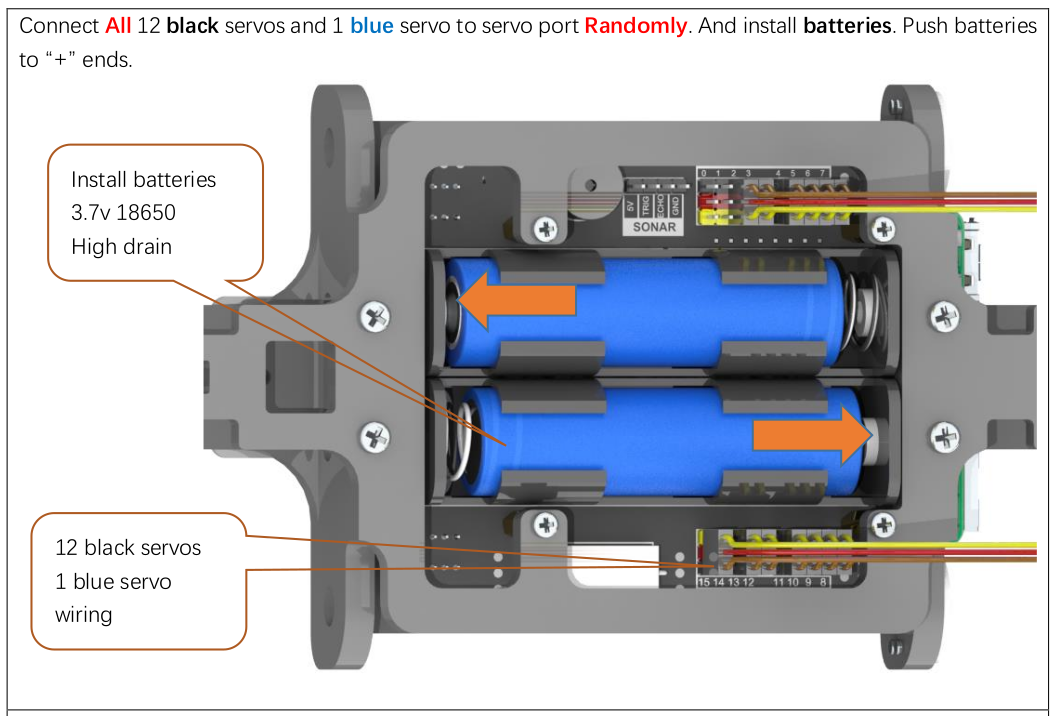
-
Install batteries
-
Connect power cable
-
Press S1 and S2 buttons ( note two indicator LEDs )
cd ~/Freenove_Robot_Dog_Kit_for_Raspberry_Pi/Code/Server
sudo python Servo.py-
All servos will rotate 90 degrees. ( [ctrl] + c to stop the script )
-
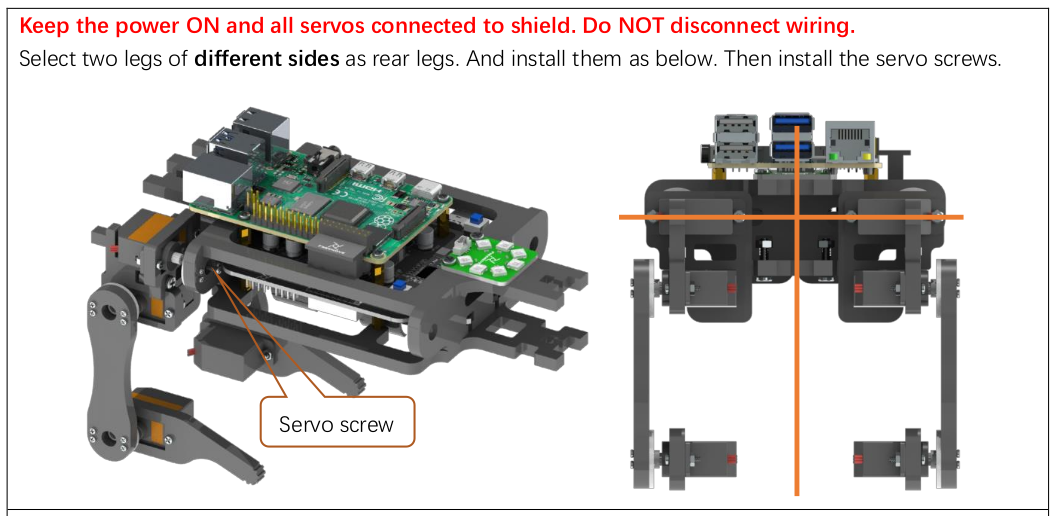
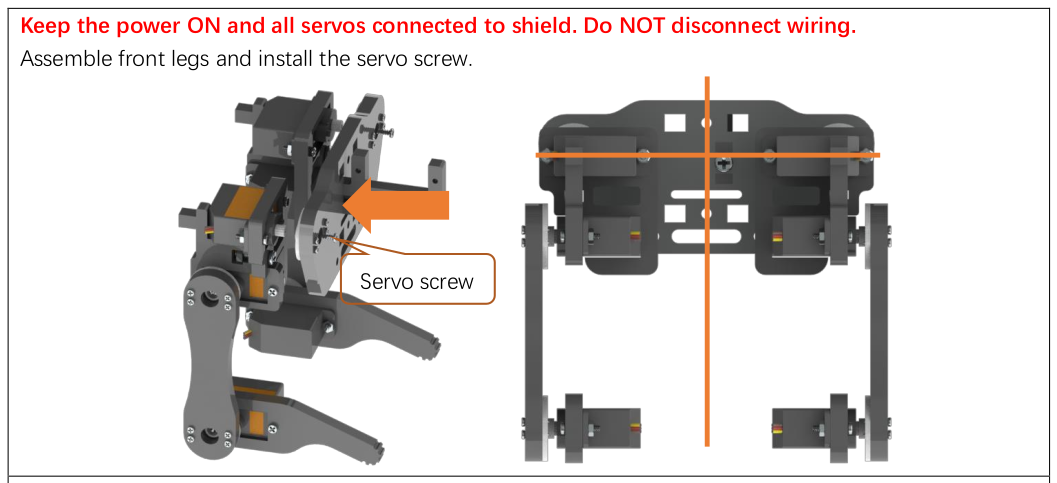
Keep power on and servos connected.
Assemble legs to body.
WARNING - Don’t disconnect servos or power.
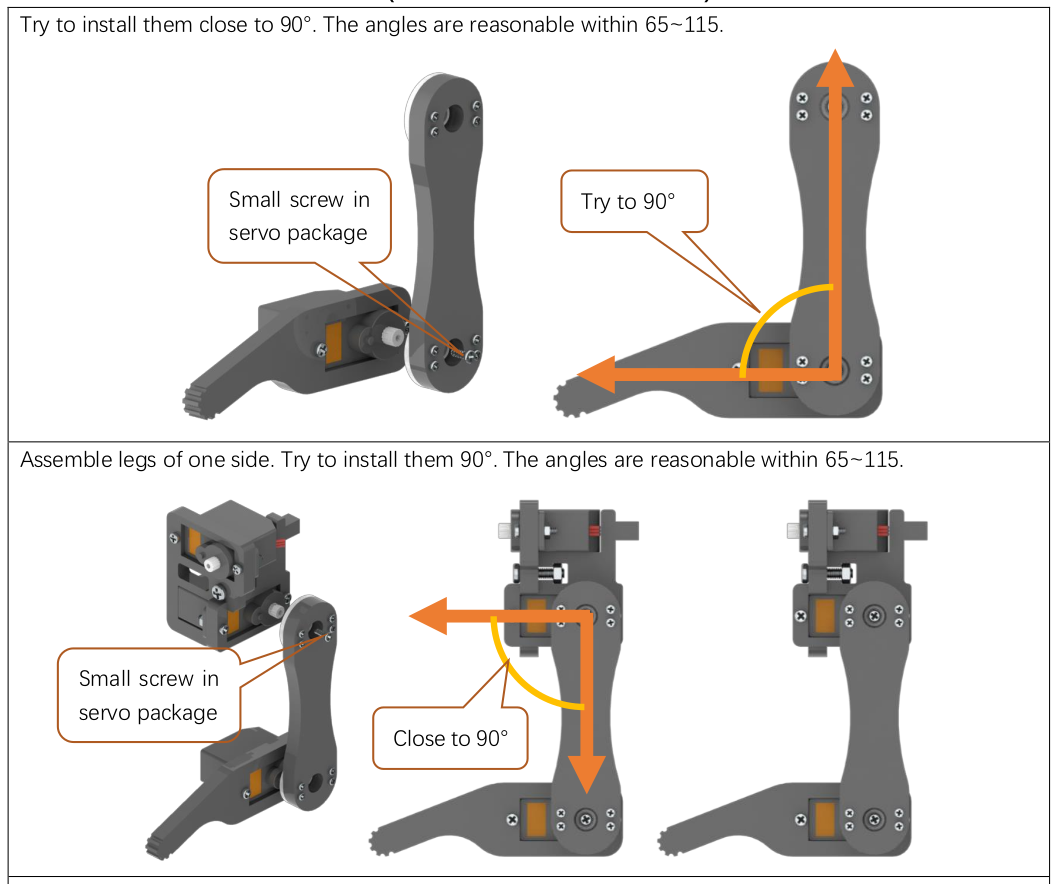
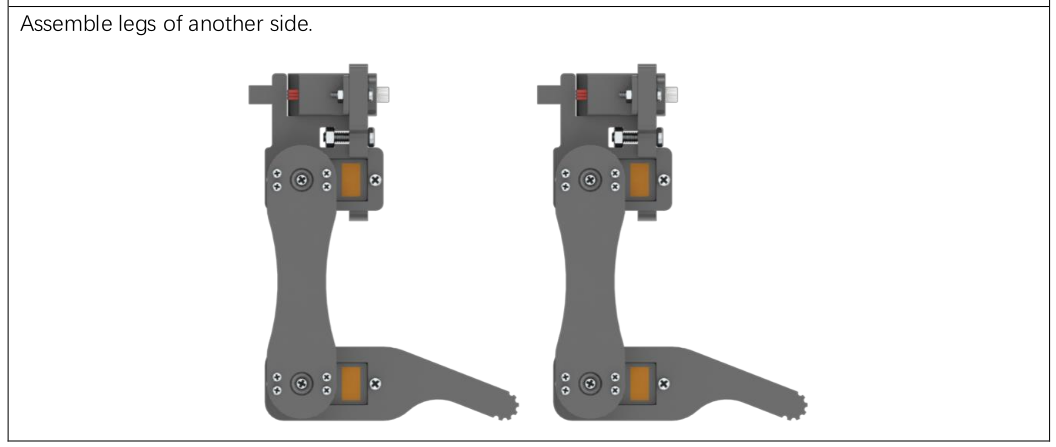
- Assemble legs at 90 degree angle ( 65 to 115 degrees ). Use the small screw from the servo package.
- Connect back legs to body, use servo screws.
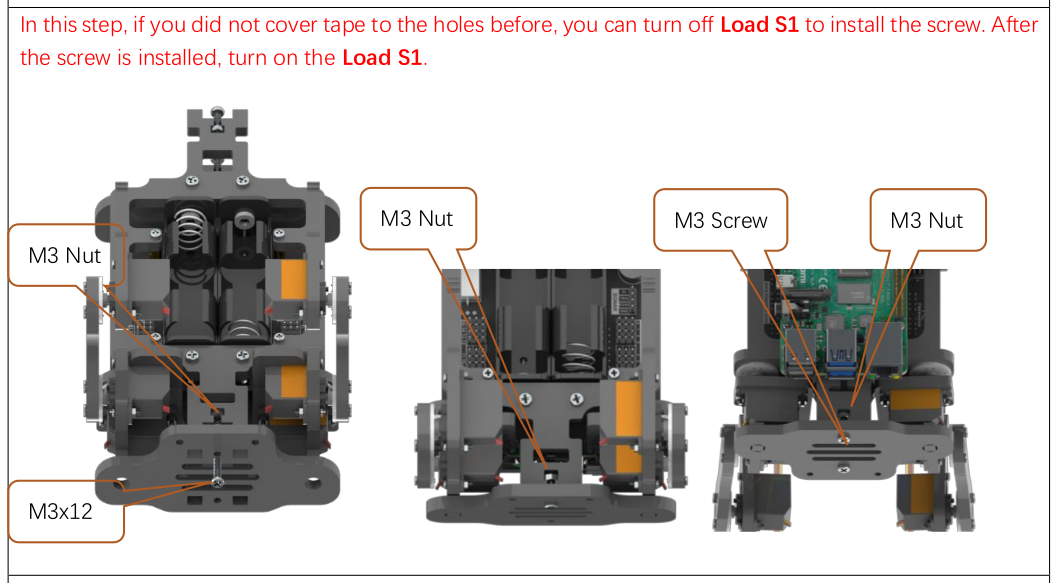
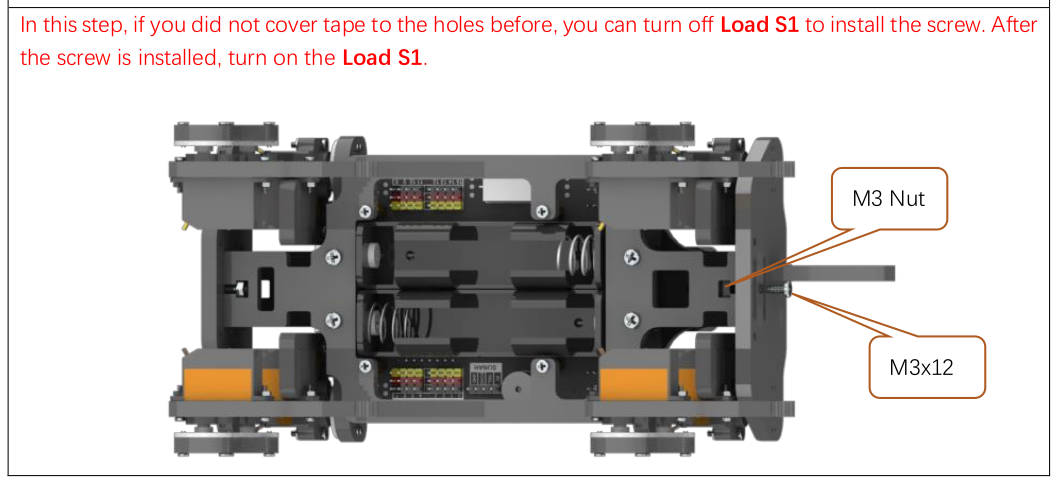
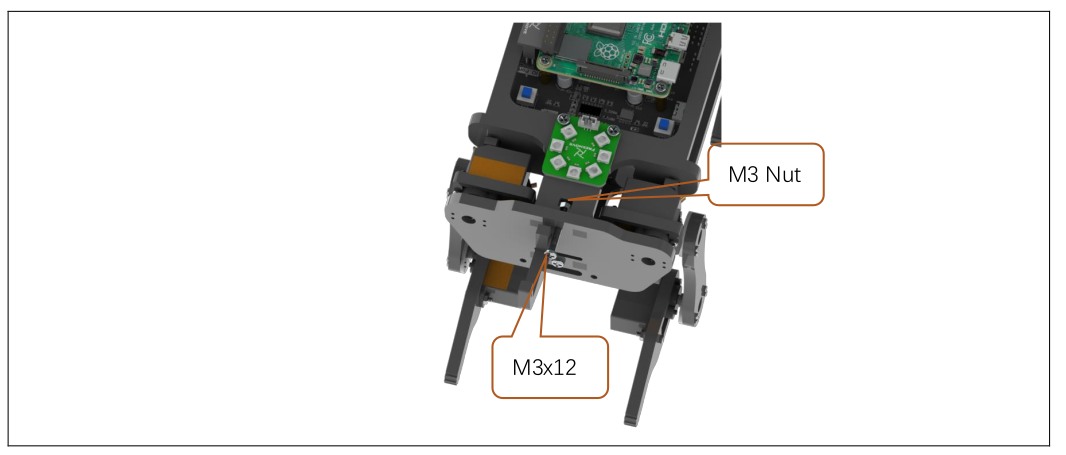
- Install a screw ( if you didn’t use tape, turn off Load S1 before and turn it on after this step ) and connect that plate thing.
- Connect a bracket to another plate thing.
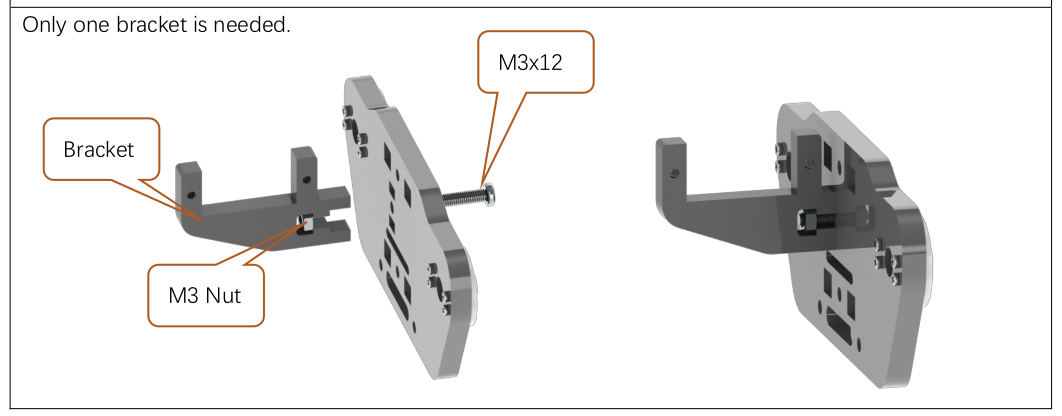
- Connect front legs to front bracket/plate thing, use servo screws.
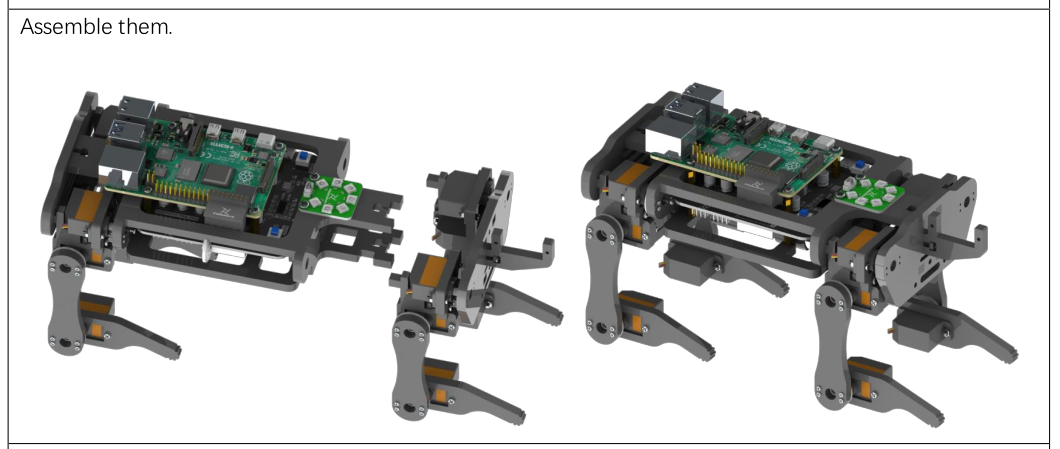
- Connect front bracket/plate thing to body ( if you didn’t use tape, turn off Load S1 before and turn it on after this step ).
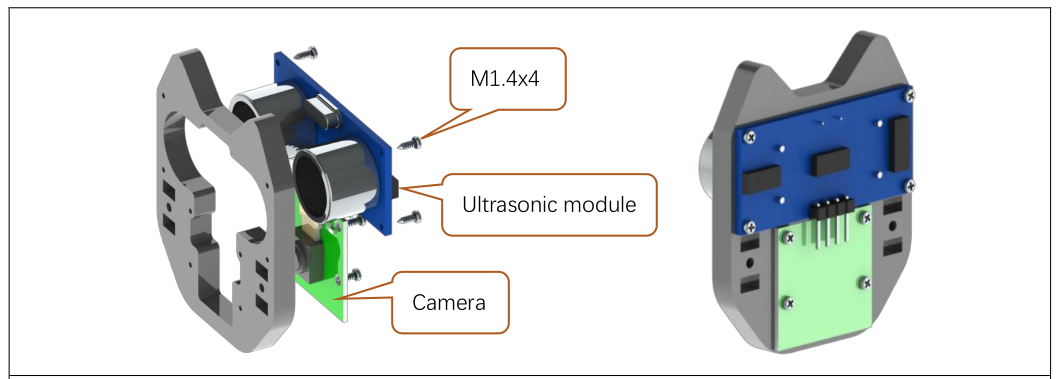
Assemble Head and Connect to Body
- Connect the ultrasonic module and the camera to the face.
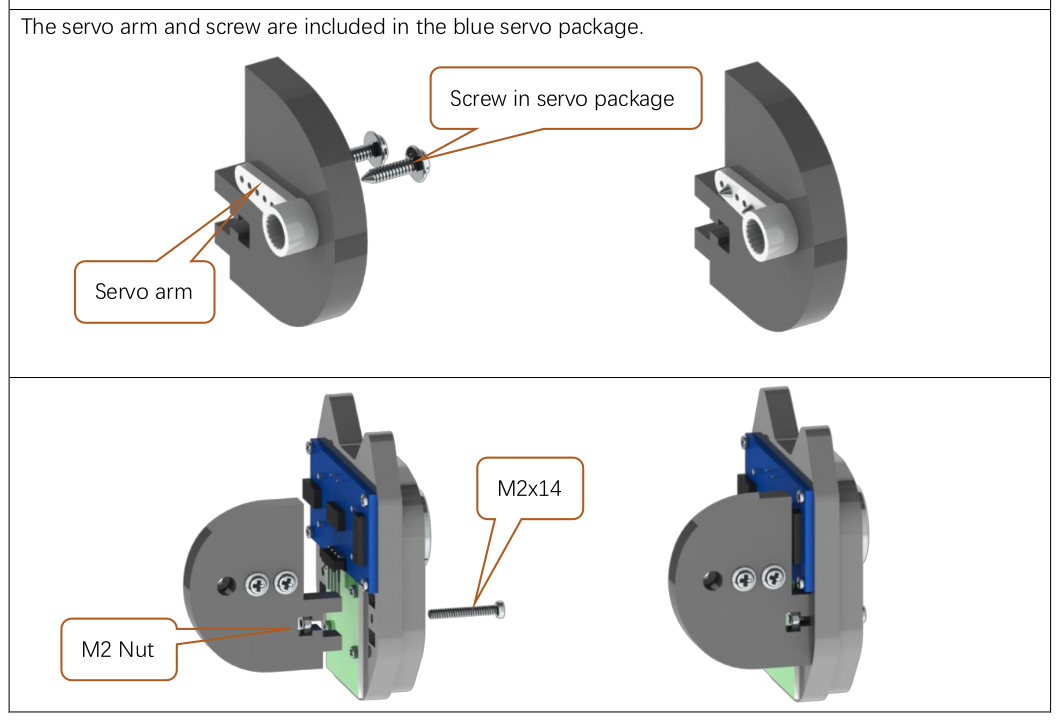
- Connect the servo arm.
- Connect the side piece.
- Connect another servo motor to the “neck” bracket.
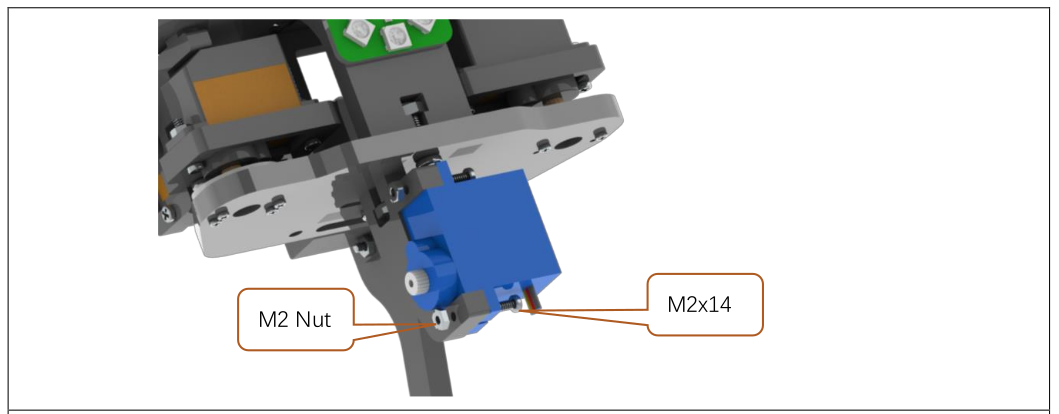
- Connect the head to the body.
- Connect another side piece.
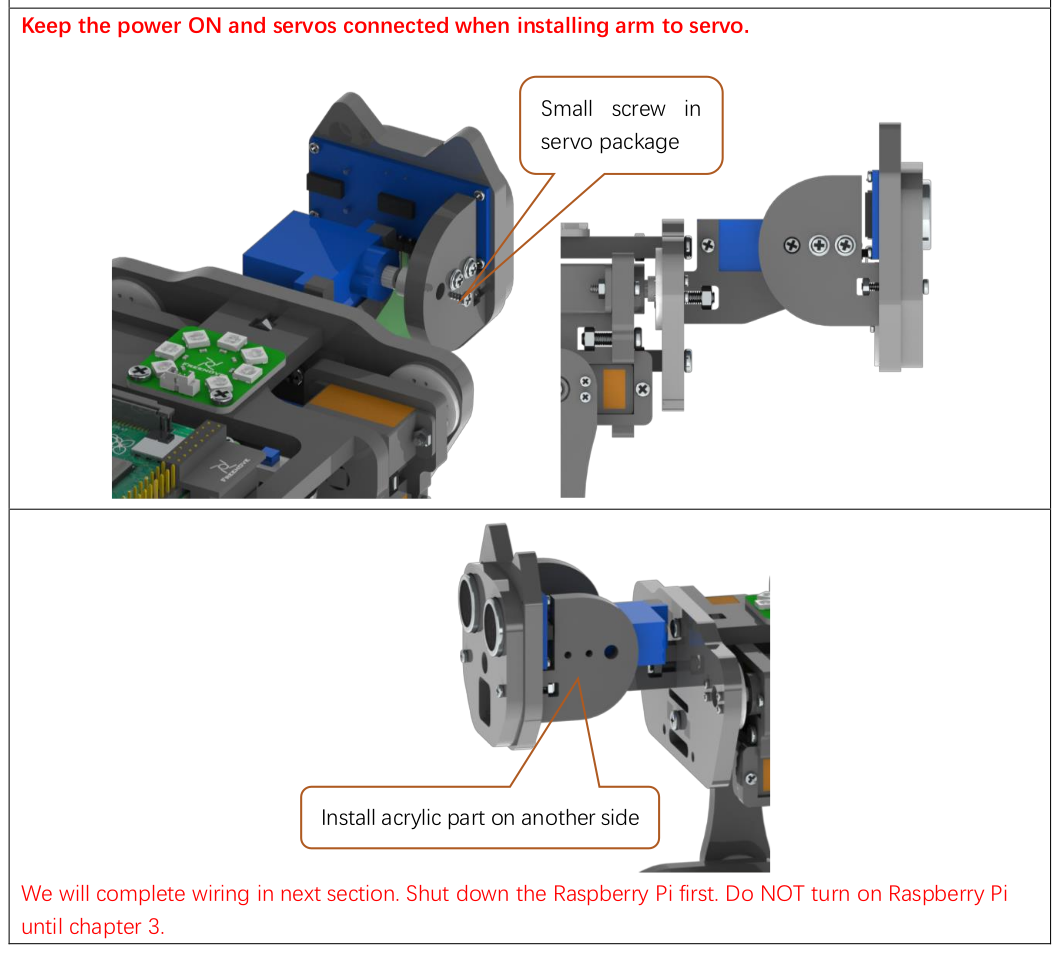
-
Shutdown Raspberry Pi
-
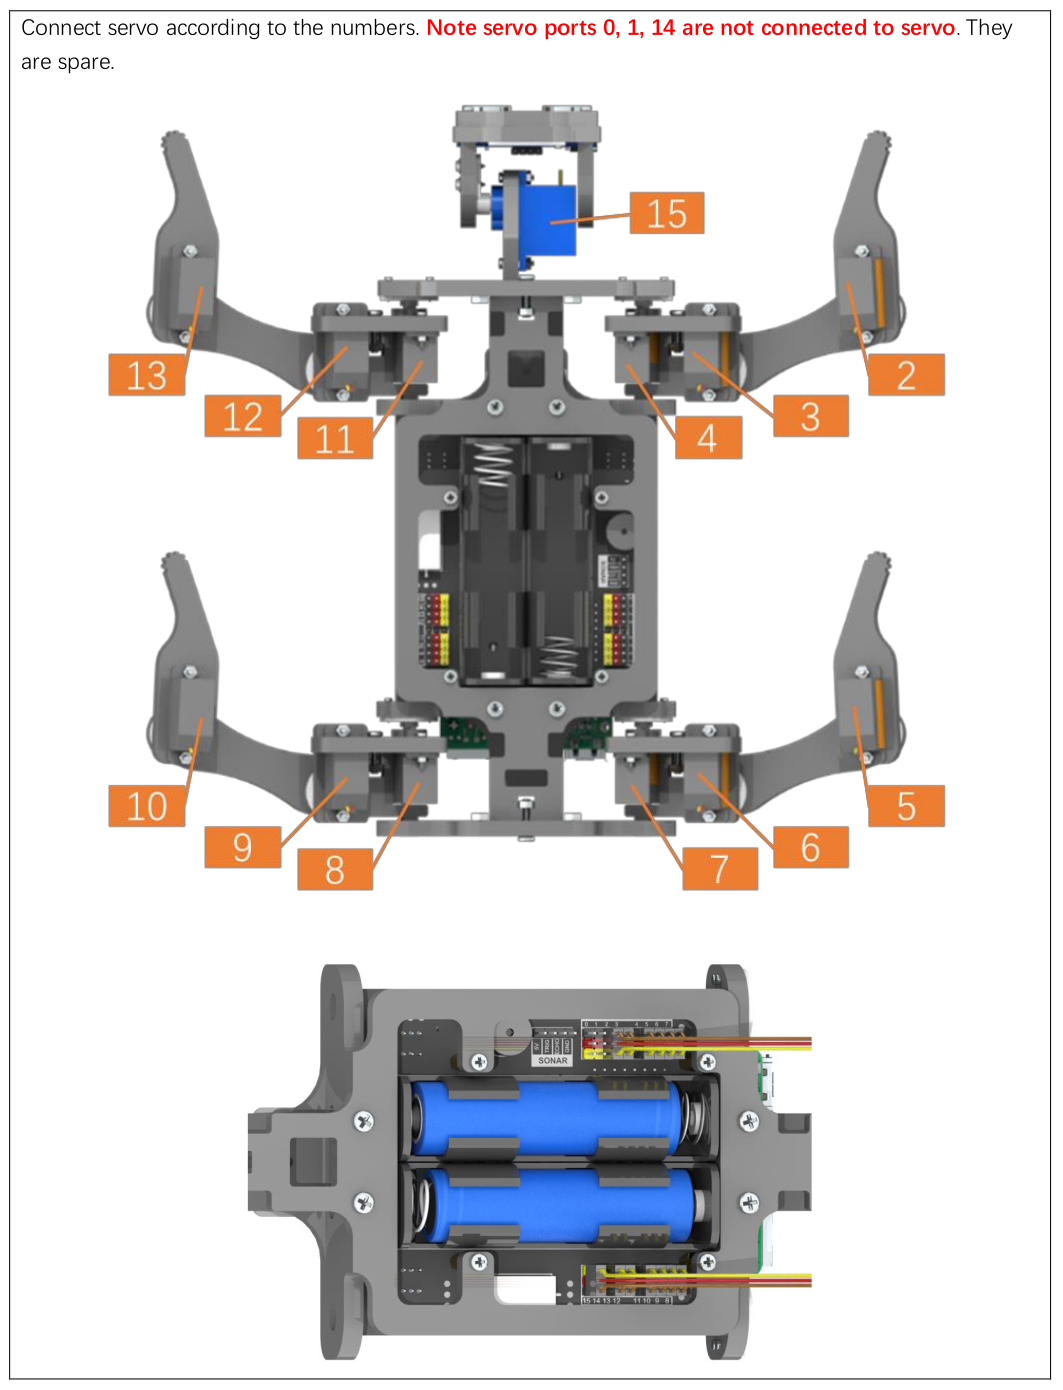
Connect servos according to numbers.
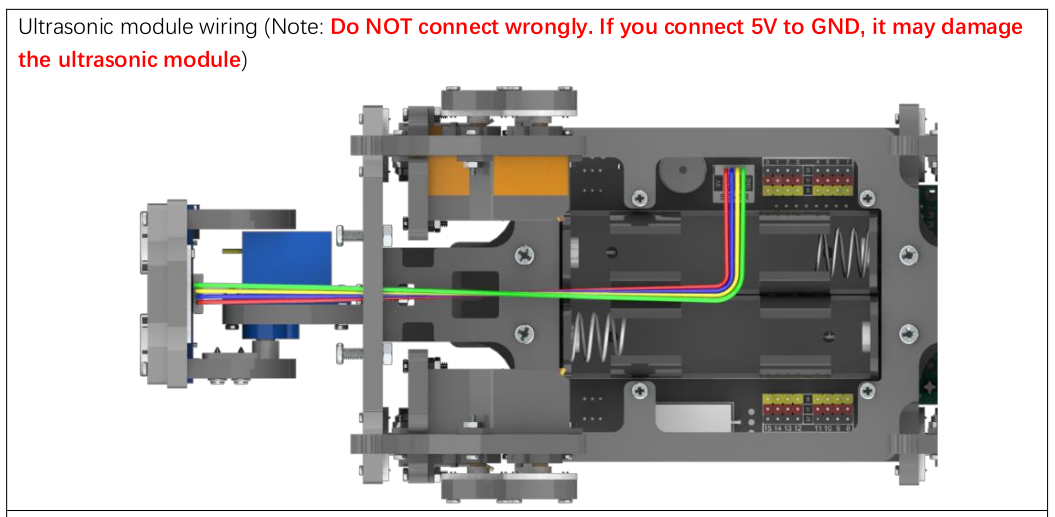
- Connect the ultrasonic module. Don’t connect it the wrong way or it could be damaged.
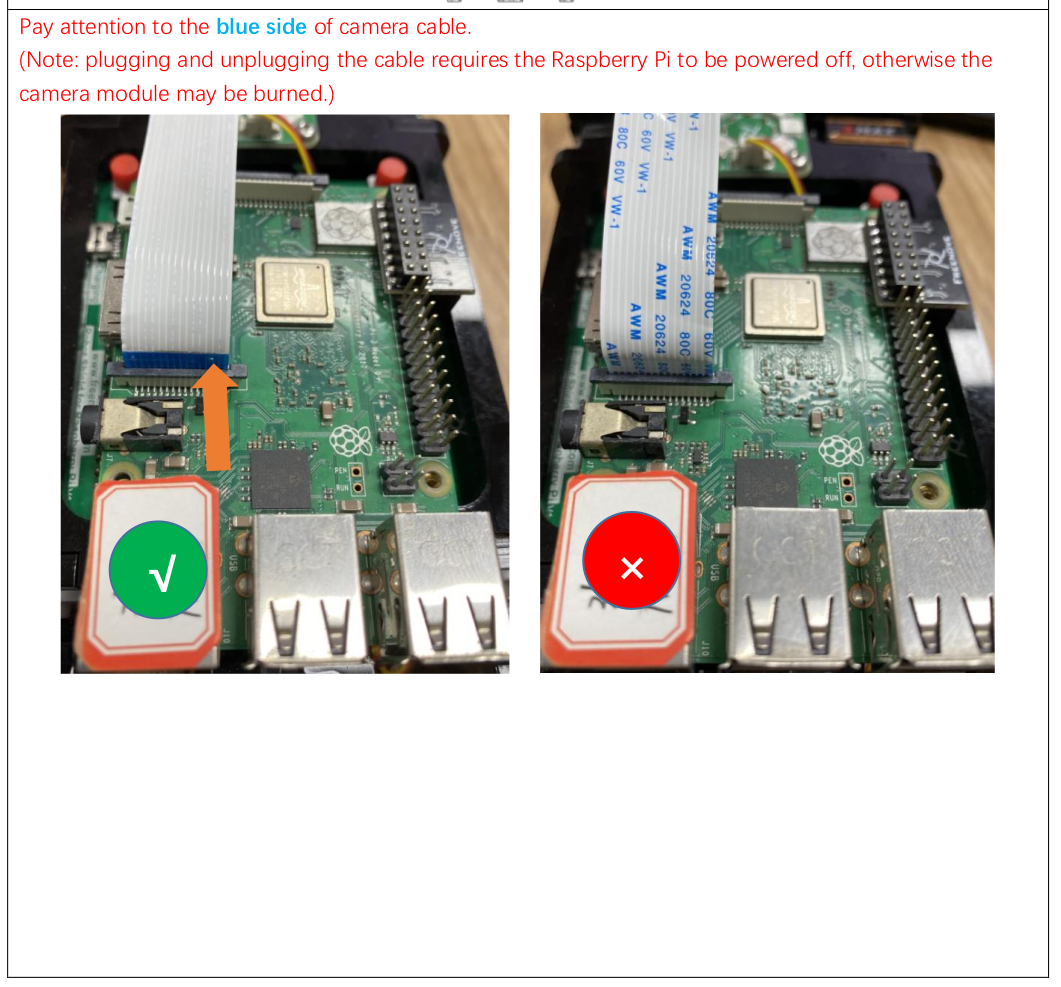
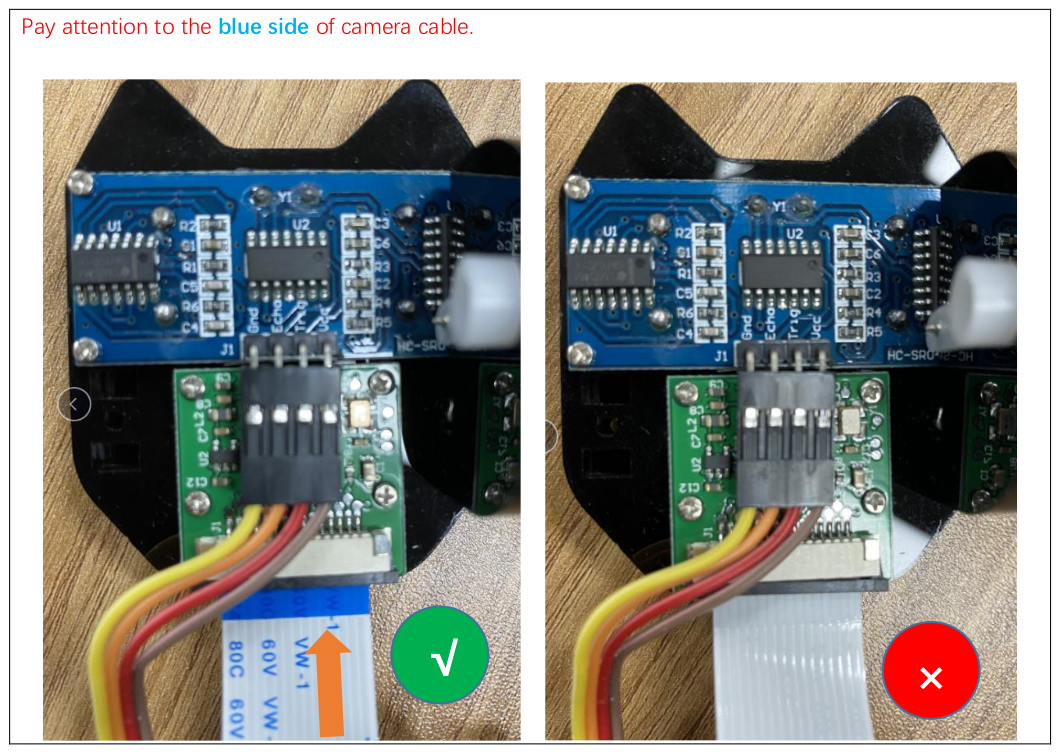
- Connect the camera. Make sure that it is facing the right way and the Raspberry Pi is shut down. Damage can occur if the camera is connected while the Pi is on.
Calibration Support and Module Test
- Install Calibration Support
-
Place on a horizontal surface
-
Power the Raspberry Pi back on
-
Turn on the S1 and S2 switches
-
Connect with VNC ( instructions say there could be errors if you don’t use VNC )
Check i2c address with this command:
i2cdetect -y 1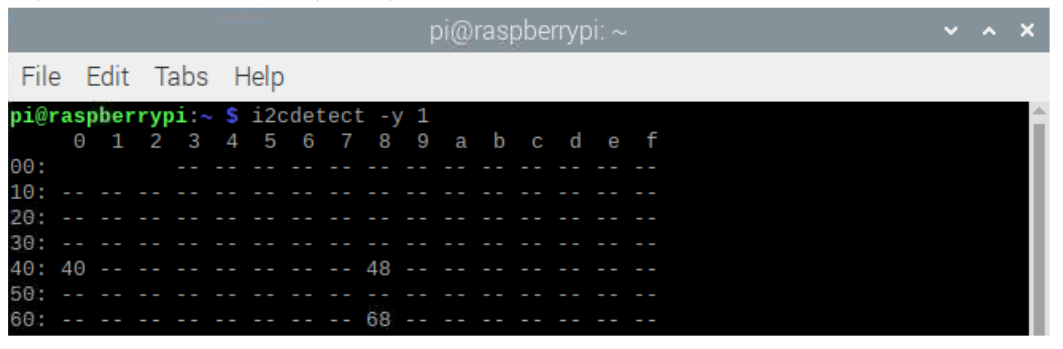
Addresses you will see and components that they correspond to:
| 0x40 | PCA9685 chip |
| 0X48 | ADS7830 chip |
| 0X68 | MPU6050 module |
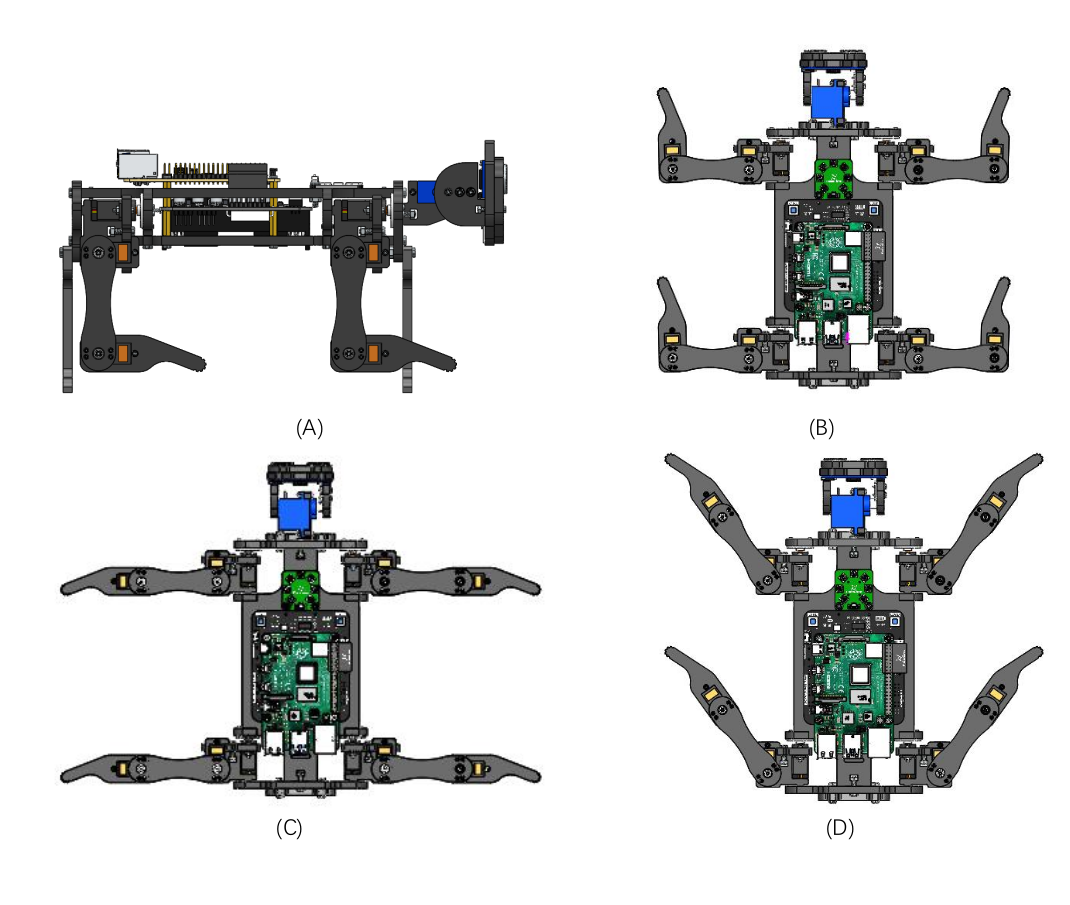
Test the servos:
cd ~/Freenove_Robot_Dog_Kit_for_Raspberry_Pi/Code/Server
sudo python test.py Servo
The robot will slowly switch to these positions(A,B,C,D):
ADC Module Test:
cd ~/Freenove_Robot_Dog_Kit_for_Raspberry_Pi/Code/Server
sudo python test.py ADC
This will show the voltage of the batteries.
To stop the test:
| [ctrl] + c |
Ultrasonic module test:
cd ~/Freenove_Robot_Dog_Kit_for_Raspberry_Pi/Code/Server
sudo python test.py Ultrasonic
This will show the distance of objects from the ultrasonic sensor.
To stop the test:
| [ctrl] + c |
LED test:
cd ~/Freenove_Robot_Dog_Kit_for_Raspberry_Pi/Code/Server
sudo python test.py Led
LED module will cycle through these in order: red, green, blue, white, and off.
‘If the LED color display order is not correct, open the “Led.py” file in the current directory and modify the value of the “self.ORDER” variable on line 16.’
To stop the test:
| [ctrl] + c |
Buzzer test:
cd ~/Freenove_Robot_Dog_Kit_for_Raspberry_Pi/Code/Server
sudo python test.py Buzzer
The buzzer will sound for 3 seconds.
Camera Test:
The camera will need to be connected and enabled.
WARNING - Don’t connect or disconnect the camera while the Pi is on. Damage can occur if the camera is connected while the Pi is on.
Check that the device exists:
ls /dev/video0Test taking an image:
cd ~/Freenove_Robot_Dog_Kit_for_Raspberry_Pi/Code/Server
raspistill -o image.jpg
You should see an image file created called image.jpg
Operations
You will need to start up a server process on the Robot’s Raspberry Pi. You will also need to run a cient program to control the robot from another system. The client can run on Windows, Mac OSX, or Linux on another Raspberry Pi. It will probably also work fine on a Linux based PC.
Start the server:
cd ~/Freenove_Robot_Dog_Kit_for_Raspberry_Pi/Code/Server
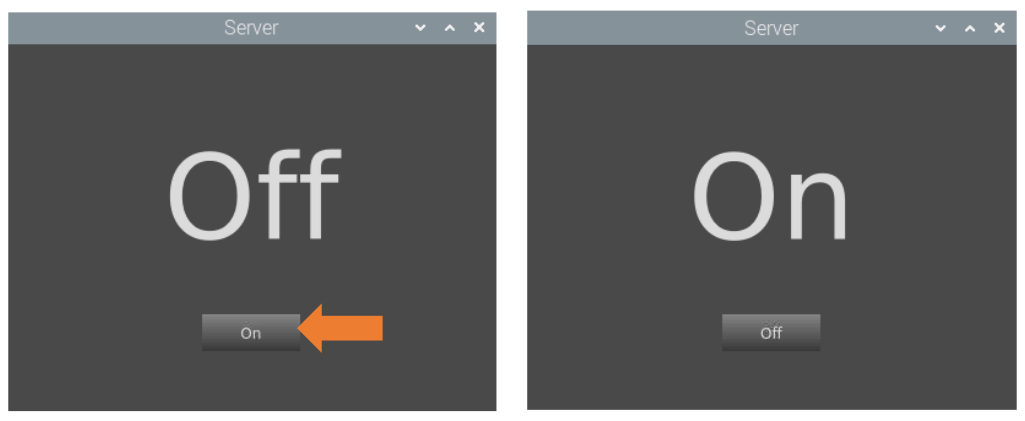
sudo python main.pyA GUI will start up.
- Click “On” to start the server and “Off” to stop it.
- The robot starts in relax mode ( on its knees ).
- The server needs to be started every time the Raspberry Pi is booted.
Running the Client
We are going to cover setting up the client on each type of system and then we will cover actually using the client and calibrating the system.
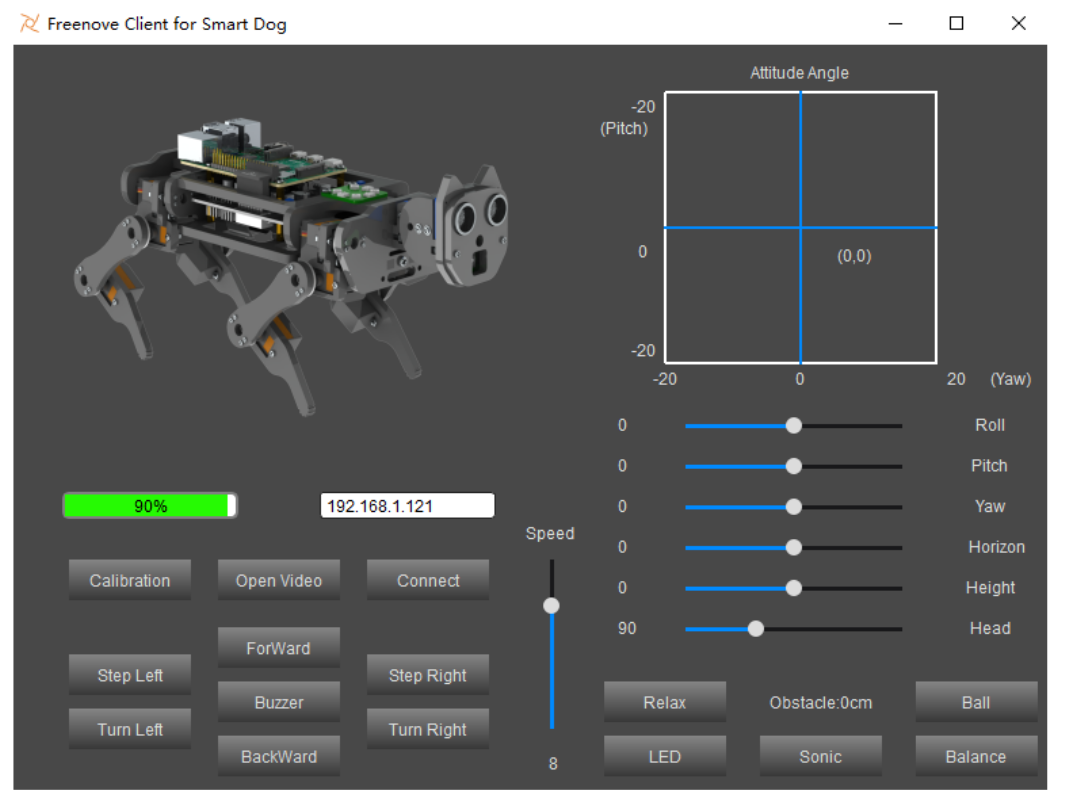
The client GUI looks like this:
Windows Client using the Exe File
- Run Client.exe
Windows Client Using Python
- Download Python 3: https://www.python.org/downloads/windows/
-
Install it
- Get code from Freenove: https://github.com/Freenove/Freenove_Four_wheeled_Smart_Car_Kit_for_Raspberry_Pi/archive/master.zip
- unzip and rename the unzipped folder ( remove the “-master” from the name )
Assuming you’ve placed it on your D drive you could use these commands to launch the setup script:
- Open a command prompt by typing this key combo:
[win] + r
- And then type this to launch a terminal
cmd- Then use these commands to launch the script:
D:
cd D:\Freenove_Robot_Dog_Kit_for_Raspberry_Pi\Code
Python setup_windows.py-
You could also just double click on setup_windows.py
-
NOTE - If anything fails you can just re-run the setup script.
Run the client:
- Open a command prompt by typing this key combo:
| [win] + r |
- And then type this to launch a terminal
cmdOnce you have a terminal open run this:
D:
D:
cd D:\Freenove_Robot_Dog_Kit_for_Raspberry_Pi\Code\Client
Python Main.py
You can run this to explicitly use Python 3 in case Python 2 is default:
Python3 Main.pyMac OSX
- Download Python 3: https://www.python.org/downloads/windows/
-
Install it
- Get code from Freenove: https://github.com/Freenove/Freenove_Four_wheeled_Smart_Car_Kit_for_Raspberry_Pi/archive/master.zip
-
unzip and rename the unzipped folder ( remove the “-master” from the name )
- Open a terminal and run this:
cd Downloads
cd Freenove_Robot_Dog_Kit_for_Raspberry_Pi/Code/
python3 setup_macos.py- NOTE - If anything fails you can just re-run the setup script.
Open a terminal and run the client:
cd Client/
python3 Main.py
Run the client from a Raspberry Pi ( Linux )
Install these packages:
sudo apt-get install -y libopencv-dev python3-opencv
sudo pip3 install opencv-contrib-python==3.4.6.27
sudo apt-get install -y libatlas-base-dev libjasper-dev
Run the setup program:
cd ~/Freenove_Robot_Dog_Kit_for_Raspberry_Pi/Code/Client
sudo python Main.py- NOTE - If anything fails you can just re-run the setup script.
Run the Client From Ubuntu Linux 20.04
I was able to get the client working on Ubuntu Linux 20.04 with some slight modifications. The package libjasper-dev was apparently removed from newer versions of Ubuntu so I needed to add an older repo and pull the package from there. I also needed to make sure to run Python 3 instead of Python 2. I installed “opencv-contrib-python” without specifying the version like this “opencv-contrib-python==3.4.6.27”. The specific version 3.4.6.27 wasn’t available but newer versions were available.
python
python3

sudo apt update
sudo apt install -y libopencv-dev python3-opencv
sudo apt install python3-pip
sudo pip3 install opencv-contrib-python

sudo add-apt-repository "deb http://security.ubuntu.com/ubuntu xenial-security main"
sudo apt update
sudo apt-get install -y libatlas-base-dev libjasper-dev


git clone https://github.com/Freenove/Freenove_Robot_Dog_Kit_for_Raspberry_Pi
 cd Freenove_Robot_Dog_Kit_for_Raspberry_Pi/Code/Client
sudo python3 Main.py
Android / IOS
There is an Android app available. You can find it here:
There is an IOS client app available. You can find it by searching freenove in the app store.
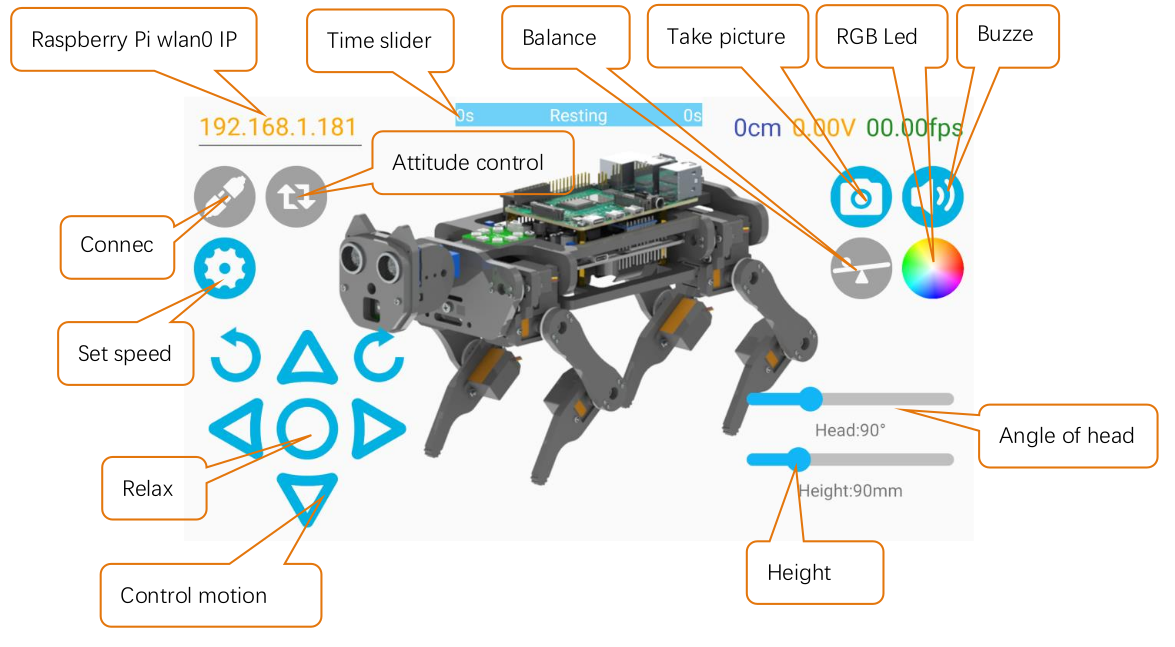
The Android / iOS app interface looks like this:

Connect and Calibrate
Once you have the client setup and running you can connect and start calibration like this:
- Enter the IP
- Click Connect
- Click Calibration
You need to calibrate before use.
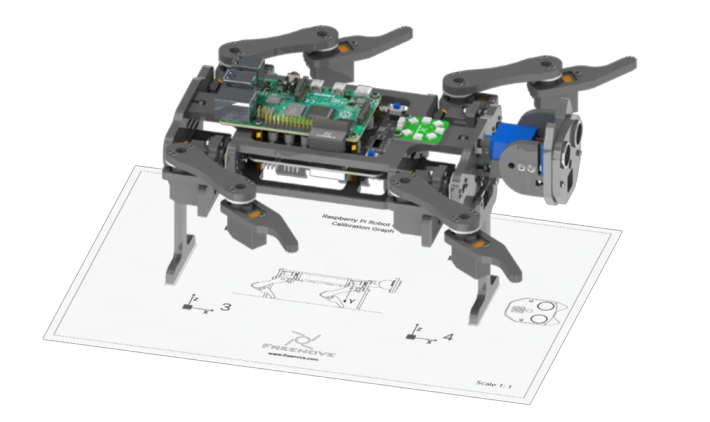
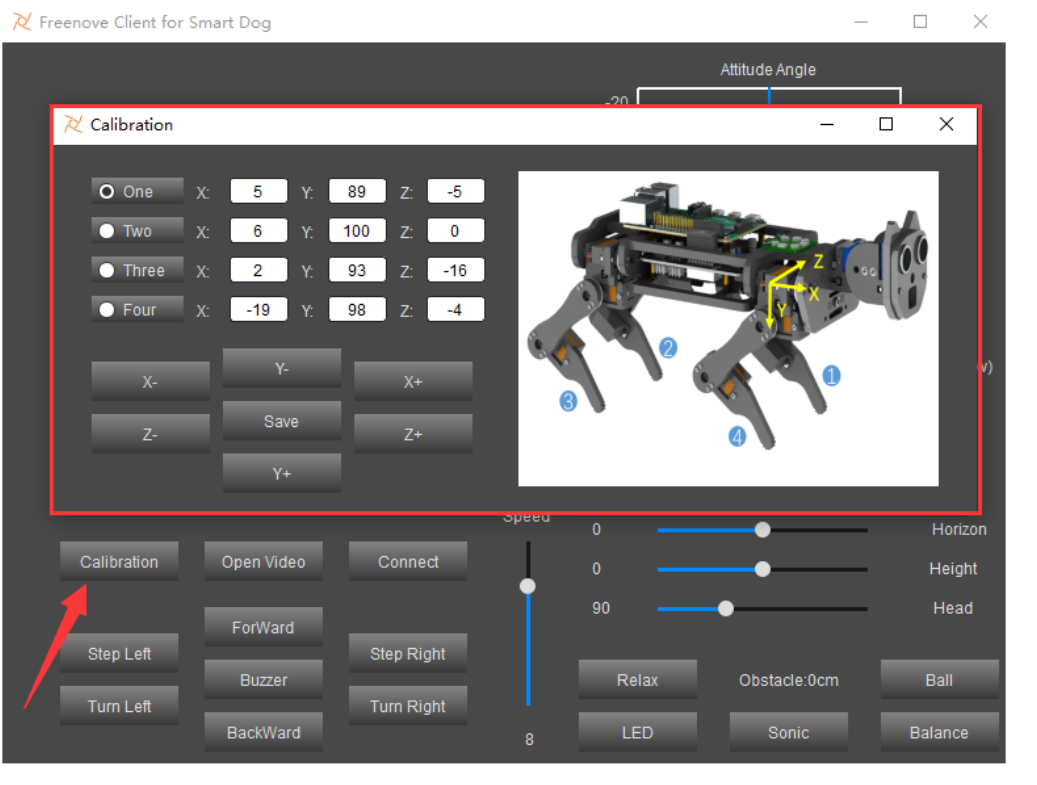
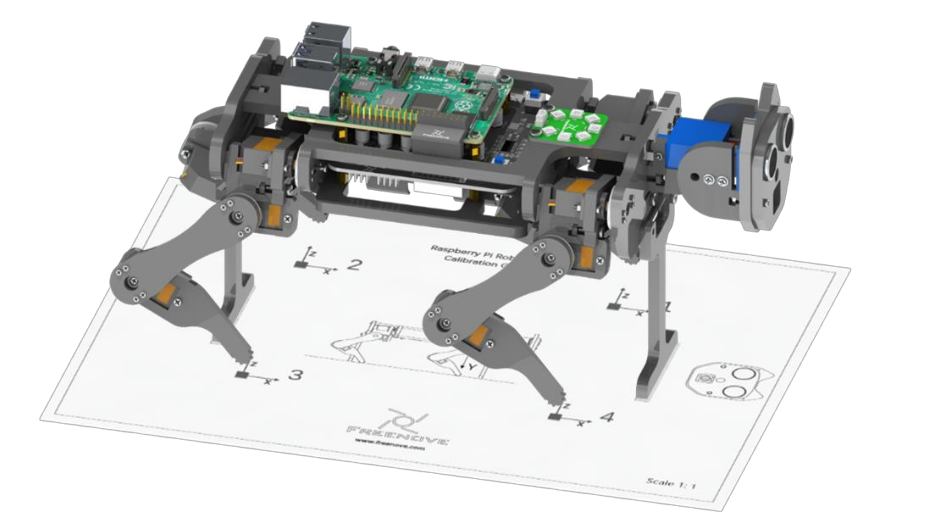
Calibration
- Put the calibration paper on a horizontal, hard surface.
- Connect the calibration supports on the robot dog.
- Click the “Calibrate” button from the client.
- Move each leg down to the dot on the paper ( make sure there is contact force ).
- Click “Save”.
NOTE - You might need to recalibrate again later if your bot’s seteps get out of sync.
Movement
You can use the coordinate system to change the angle of the body ( drag the cursor ).
You can also use the keyboard to move:
| Button on Client | Key | Action |
| ForWard | W | Move |
| BackWard | S | Back off |
| Turn Left | A | Turn left |
| Turn Right | D | Turn right |
| Step Left | Q | Step Left |
| Step Right | E | Step Right |
| Connect/ Disconnect | C | On/Off Connection |
| Open Video/ Close Video | V | On/Off Video |
| Calibration | M | Open calibration interface |
| Buzzer/Noise | Space | On/Off Buzzer |
| Relax | R | Relax station |
| LED | L | Open LED control interface |
| Sonic | U | Measure and display distance from obstacle |
| Balance | B | Open/Close balance mode |
| Face/Ball/Close | F | Face recognition and ball tracking |
| Face ID | Input images of human faces |
Relax Mode:
- After moving for 3 minutes it will switch to relax mode for 1 minute to protect the servos from over heating. It won’t move but will can still do other things ( video, LED, etc ).
- If it rests for 1 minute at any time the 3 minute timer will be reset.
- If not moving for 10 seconds it will enter relax mode but will respond.
Relax mode looks like this:

Facial Recognition
You can use the “Face ID” button to take pictures and train the robot to recognize a face. You can assign names to faces.
You can use the “Face” button to identify faces.
| SliderBar | Function |
| Head | Adjust head angle. |
| Height | Control body height. |
| Horizon | Make body move forward or back. |
| Yaw | Adjust Yaw angle of body |
| Pitch | Adjust Pitch angle of body |
| Roll | Adjust Roll angle of body |
Unboxing Video
This is our unboxing video. The assembly instructions and demo will be in separate videos. This one just shows you what comes in the box.
Amazon affiliate disclosure statement We are a participant in the Amazon Services LLC Associates Program, an affiliate advertising program designed to provide a means for sites to earn advertising fees by advertising and linking to amazon.com.