Docker Tutorial
This is our brand new tutorial for Spring 2020. If you just want our quick cheat sheet, check here: Docker Cheat Sheet. If you want more detailed instructions, keep reading. We are going to cover all of the topics listed here and we are going to include video instrucions.
- What is Docker
- Docker Cheat Sheet
- Install Docker on Ubuntu
- Basics
- Docker Hub / Registry
- Building Docker Images From A Dockerfile
- Volumes / Storage
- Docker Networking
- Overlay Networks
- Swarms
- Compose
- Docker Machine
On this page we are going to show you how to setup and use Docker. We’re going to cover just about everything you might want to do while keeping it at least somewhat concise. We also may gloss over some of the things we don’t like, for example compose. We will try to note where we do this though.
The official Docker site can be found here: https://www.docker.com The Moby Project can be found here: https://mobyproject.org
NOTE - For most examples we use assume that you are running Linux, specifically Ubuntu 18.04. Other versions and distros should work almost the same. OSX and Windows are also an option, just not what we use for our examples. Many of the commands need root privileges. You will probably either need to either run as root or use sudo with many commands. Sudo is generally the ‘correct’ choice. We don’t always show the use of sudo in each of the example commands but you may need it.
What is Docker?
Docker is a system for containerization. A container is basically an isolated environment that behaves like a separate system. You could think of it kind of like a virtual machine except that it doesn’t require an entire copy of the operating system to be installed. Each container has much less overhead than a virtual machine. Docker makes it easy to package and ship applications.
Big Docker Cheat Sheet
We have an excellent cheat sheet that contains just about every command you might want to know. You can find it here: Docker Cheat Sheet.
We recommend that you use the docker cheat sheet as a reference along side this tutorial.
Install Docker on Ubuntu
We are installing Docker on Ubuntu. This has been tested on Feb 26, 2020 using Ubuntu 18.04.3 (both server and desktop) and it works great using the commands below. The Ubuntu package gave me Docker version 18.09.7. This is on the current long term support version of Ubuntu.
Easy Method
Super easy install on Ubuntu 18.04.3 with the Ubuntu provided packages:
sudo apt install docker.io
You might wanta newer version of Docker. The latest version on docker.com is 19.03.6. They have split this into three different packages: docker-ce, docker-ce-cli, and containerd.io. They halso have an enterprise edition of Docker that uses the following packages: docker-ee, docker-ee-cli, and containerd.io. The Ubuntu package should probably be fine but if you want to install a more up to date version you will have to add the docker.com repo.
Elaborate Method
More elaborate installation that gives you the newer packages from docker.com:
sudo apt-get update

sudo apt-get install \
    apt-transport-https \
    ca-certificates \
    curl \
    gnupg-agent \
    software-properties-common

curl -fsSL https://download.docker.com/linux/ubuntu/gpg | sudo apt-key add -

sudo apt-key fingerprint 0EBFCD88

sudo add-apt-repository \
   "deb [arch=amd64] https://download.docker.com/linux/ubuntu \
   $(lsb_release -cs) \
   stable"

sudo apt-get install docker-ce docker-ce-cli containerd.io
Start / Stop Docker Daemon
Start / Stop the Docker Daemon:
dockerd                        # start docker directly (don't)
sudo start docker              # start using upstart (old)
sudo stop docker               # stop  using upstart (old)
sudo systemctl start docker    # start using systemd
sudo systemctl stop docker     # stop  using systemd
Basic Docker Usage
If you don’t name a container it will be given a goofy looking default name such as: “clever_lichterman” or “ecstatic_banach”.
Run a basic hello world docker container:
docker run hello-world
When a container finishes running it will stop. From there you can choose to start it again if you like. Using a command that doesn’t terminate will keep the container running.
- -t will allocate a pseudo-TTY
- -i interactive, keeps STDIN open even when nothing is attached
- -d detached mode, returns the container ID while running the container in the background
- --rm when the container exits, cleanup the container and remove the filesystem
Run a container in foreground mode with a shell. When you exit the shell, the container will also exit.
docker run -it ubuntu bash
You don’t need to specify the command bash.
docker run -it ubuntu
Run a container in detached mode. It won't connect until you explicitly attach (see below) and it won't exit when you exit the shell.
docker run -tid ubuntu
Create a container without starting it:
docker create -ti ubuntu
Give your container a name:
docker run -tid --name my-container1 ubuntu
You can also specify a hostname:
docker run --hostname test1 --name test1 -tid ubuntu
Show containers with the following commands:
docker ps                          # show running containers
docker ps -a                       # show all containers
docker ps --filter name=redis      # show matching containers
docker ps --filter name=redis -q   # show matching container ID
You can use the inspect command to view a huge dump of details about a particular container.
docker inspect clever_lichterman
You can start and stop a container like this:
docker start clever_lichterman
docker stop clever_lichterman
If you want to connect to a shell running container you can do it in a few different ways. You could use the attach command to attach to the container. You could also use the exec commmand to lauch a bash shell.
docker attach smelly-hippo         # connect to running container
                                   # ( login ) exit with CTRL-p CTRL-q.

docker exec -it smelly-hippo bash  # get shell on host
You can delete a container like this (stop it first):
docker stop clever_lichterman
docker rm clever_lichterman
We can make sure that the container is cleaned up after it finishes with the –rm option. There is a neat example image in the docker repo called whalesay that basically just includes what looks like a modified cowsay command. Both of these containers will be removed once they finish running.
docker run --rm hello-world
docker run --rm docker/whalesay cowsay "Hello World"
You can copy files to a container and execute commands on that container with the following:
docker cp junk smelly-hippo:/opt/webapp   # copy file to container
docker exec smelly-hippo ls /opt/webapp   # run command on container1
You can rename a container like this:
docker rename epic_volhard smelly-hippo
Container Lifecycle Stuff
Containers can be started, stopped, restarted, and more with the following commands:
docker start   smelly-hippo             # start
docker stop    smelly-hippo             # stop
docker stop    smelly-hippo funny-frog  # stop mutliple
docker restart smelly-hippo             # restart container
docker pause   smelly-hippo             # pauses a running container, freeze in place
docker unpause smelly-hippo             # unpause a container
docker wait    smelly-hippo             # blocks until running container stops
docker kill    smelly-hippo             # sends SIGKILL, faster than stop
docker rm      smelly-hippo             # remove
docker rm      smelly-hippo container5  # remove multiple
docker rm -f   smelly-hippo             # force remove
Remove all containers, running or stopped:
docker container rm -f $(docker ps -aq)
Resource Limits and Controls
Docker allows you to limit the resources used by a container. You can control how much memory and CPU is used. You can limit disk usage. You can even assign a container to use specific CPUs.
docker run -tid -c 512 ubuntu                     # 50% cpu
docker run -tid --cpuset-cpus=0,4,6 ubuntu         # use these cpus
docker run -tid -m 300M ubuntu                     # limit memory
docker create -ti --storage-opt size=120G ubuntu   # limit storage, not on aufs
Container Stats, Logs, and Events
The stats command will show resources used by currently running containers. It shows things like CPU, memory, and IO. You can also view the the running processes on a specific container with the top command. You can view the logs of a container with the logs command. This will include output to the console (what you see when you attach). The events command will show allow you to watch Docker events as they occur. You can see things like containers starting and stopping. The port command will show public facing ports for a specific container.
docker stats                   # resourse stats for all containers
docker stats container1        # resource stats for one container
docker top  nostalgic_colden   # shows processes in a container
docker logs web                # container logs
docker events                  # watch events in real time
docker port nostalgic_colden   # shows public facing port of container
docker diff practical_sinoussi   # show changes to a container's file system
Docker Images
Containers are launched from prebuilt imagaes. You can build and modify images yourself. You can also pull them down from Docker Hub.
You can aquire images from the following sources:
- Pull from Docker Hub
- Commit a container
- Build using a Dockerfile
Images
You can list the available images with the images command:
docker images
You can show an image’s history like this:
docker history ubuntu
You can remove images like this:
docker image rm user1/funny-frog     # remove image
docker image remove 113a43faa138     # remove by id
docker image remove user1/funny-frog # remove image
docker rmi user1/funny-frog          # remove image
docker rmi $(docker images -q)   # remove all images
You generally need to stop all containers using an image before you can remove it. You can remove images with any of these commands. You can also force image removal. Note that you can use 'rm' or 'remove'. They both work in this case.
New Image From A Container
You can create an image from an existing container like this:
docker commit smelly-hippo                               # no repo name
docker commit smelly-hippo test1                         # repo name
docker commit smelly-hippo loworbitflux/test1            # repo name
docker commit smelly-hippo loworbitflux/test1:my-update  # tagged
docker commit smelly-hippo loworbitflux/test1:v1.2.3     # tagged
Export / Import / Save / Load
docker export    # export container to tarball archive stream
docker import    # create image from tarball, excludes history ( smaller image )
docker load      # load an image from tarball, includes history ( larger image )
docker save      # save image to tar archive stream ( includes parent layers )

docker load < my-image.tar.gz
docker save my_image:my_tag | gzip > my-image.tar.gz
cat my-container.tar.gz | docker import - my-image:my_tag
docker export my-container | gzip > my-container.tar.gz
A better way to create an image is to build it using a Dockerfile as we will cover further on in this guide.
Docker Hub / Registry
Docker Hub is kind of like GitHub except for Docker images. You don't need an account to pull images down. This is where they will be pulled from by default if they can't be found locally on your machine. If you want to upload images for others to use, you will need an account. You can sign up here: https://hub.docker.com.
Once you have an account you can log in and out like this. It will prompt you for a password.
docker login
docker logout
Before uploading you will need to tag your release using the tag command. Here we tag it with the image ID. Once you have got it tagged, you can upload it to DockerHub with the push command.
docker tag 7d9495d03763 loworbitflux/smelly-hippo:latest
docker push loworbitflux/smelly-hippo
You can search for images and pull them down like this:
docker search mysql    # search for an image
docker pull mysql      # pull it down
If you try to run a container using an image that isn't available on the local system, an automatic attempt will be made to find it and pull it down so that the container can be started.
docker run user1/funny-frog # will be downloaded if it isn’t here
Building Docker Images From A Dockerfile
A Dockerfile can be used to create an image. You start out by creating a new directory and createing the file inside that directory. The file will need to be named "Dockerfile". Any other files you want included in your image should be placed here as well.
You can build an image from the docker file with the build command.
mkdir mydockerbuild               # create build dir
cd mydockerbuild                  # cd into build dir
vi Dockerfile                     # edit build instructions
docker build -t mydockerimage .   # build the image
docker images                     # show images
docker run mydockerimage          # run the new image
Here is a very basic example of what goes into a Dockerfile.
FROM docker/whalesay:latest
RUN apt-get -y update && apt-get install -y fortunes
CMD /usr/games/fortune -a | cowsay
Here is a real example that creates an NGINX web server based on the Ubuntu image:
FROM ubuntu

RUN apt update
RUN apt install nginx -y
CMD ["/usr/sbin/nginx"]
More Complete Dockerfile Example
Here is a more complex exampel of a Dockerfile. This one includes most of the options that are likely to be useful. You can do all sorts of things like exposing ports, copying in extra files, installing packages, adding storage, and more. Note that these commands don't all really fit together. I just tried to fit as much as possible in there.
WARNING - I just mixed a bunch of options together. Don’t actually use this example.
FROM ubuntu                         # base image
RUN apt update                      # run commands while building
RUN apt install nginx -y            # run commands while building
WORKDIR ~/                          # working dir that CMD is run from
ENTRYPOINT echo                     # default application
CMD "echo" "Hello docker!"          # main command / default application
CMD ["--port 27017"]                # params for ENTRYPOINT
CMD "Hello docker!"                 # params for ENTRYPOINT
ENV SERVER_WORKS 4                  # set env variable
EXPOSE 8080                         # expose a port, not published to the host
MAINTAINER authors_name             # deprecated
LABEL version="1.0"                 # add metadata
LABEL author="User One"             # add metadata
USER 751                            # UID (or username) to run as
VOLUME ["/my_files"]                # sets up a volume
COPY test relativeDir/              # copies "test" to `WORKDIR`/relativeDir/
COPY test /absoluteDir/             # copies "test" to /absoluteDir/
COPY ssh_config /etc/ssh/ssh_config     # copy over a vile
COPY --chown=user1:group1 files* /data/ # also changes ownership
ADD /dir1 /dir2                         # like copy but does more ...
Docker ENTRYPOINT vs CMD
The default value for ENTRYPOINT is ‘/bin/sh -c’. CMD just specifies parameters to this. CMD can be used to specify your main application and it’s paramters. You can also override ENTRYPOINT and just use CMD to hold the paramters.
Volumes / Storage
docker info | grep -i storage      #  check storage driver ( Ubuntu default: overlay2 )
docker inspect web    # look for “Mounts”
docker volume ls
docker volume create testvol1
docker volume inspect testvol1
| :ro | for read only |
| :z | shared all containers can read/write |
| :Z | private, unshared |
docker run -d --name test1 -v /data ubuntu
docker run -d --name test2 -v vol1:/data  ubuntu       # named volume
docker run -d --name test3 -v /src/data:/data ubuntu     # bind mount
docker run -d --name test4 -v /src/data:/data:ro ubuntu  # RO

docker run -d --volumes-from test2 --name test5 ubuntu  # storage can be shared
docker rm -v  test1                 # remove container and unnamed volume
docker volume ls -f dangling=true   # find dangling ( unused ) volumes
docker volume rm volume1            # remove volume
dockerd --storage-driver=devicemapper & # run docker with device mapper or set in /etc/default/docker
NOTE - On Linux volumes will be stored here by default: /var/lib/docker/overlay2. You can increase the storage space for this directory by mounting a large storage device here.
AUFS is a unification filesystem – fast, efficient, old, stable, copy-on-write technology (CoW)
Docker Networking
Expose Ports
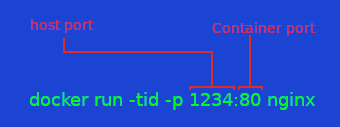
docker run -tid -p 1234:80 nginx   # expose container port 80 on host port 1234

docker run -tid -p 80:5000            ubuntu  # bind port
docker run -tid -p 8000-9000:5000     ubuntu  # bind port to range
docker run -tid -p 80:5000/udp        ubuntu  # udp ports
docker run -tid -p 127.0.0.1:80:5000  ubuntu  # bind port on an interface
docker run -tid -p 127.0.0.1::5000    ubuntu  # bind any port, specific interface
docker run -tid -P                    ubuntu  # exposed ports to random ports
Networks
Network Info
You can view information about available networks with the following commands.
docker network ls               # show networks, bridge is default
docker network inspect bridge   # show network details and connected containers
Network Creation
You can create a new network with the 'network create' command. In this example we create a new bridge network with the bridge driver. The “-d bridge” is not really needed because that is the default.
docker network create -d bridge my-bridge-network
Create a network with an explicit subnet. This also allows us to explicitly specify IPs for containers that are added to this network.
docker network create -d bridge --subnet 172.25.0.0/16 my-network
docker network create --subnet 203.0.113.0/24 --gateway 203.0.113.254 my-network
The default binding IP address can be specified like this:
docker network create -o "com.docker.network.bridge.host_binding_ipv4"="172.23.0.1" my-network
Connecting to a Network
You can specify which network to connect to when starting a container. A specific IP can be assigned as well. To assign an IP the subnet for the network will have to have been specified explicitly.
docker run -tid --net=my-bridge-network --name test1 ubuntu
docker run -tid --net=my-bridge-network --ip=172.25.3.3 --name=test1 ubuntu
You can also connect a running container to a specific network. You can specify an IP if you want.
docker network connect my-bridge-network test1
docker network connect my-bridge-network test2  --ip 172.25.0.102
You can inspect a container and grab only the network info. You can also grab just the IP address if you want.
docker inspect -f '{{json .NetworkSettings.Networks}}'  container1
docker inspect -f '{{range .NetworkSettings.Networks}}{{.IPAddress}}{{end}}' container1
Disconect and Remove
You can disconnect and remove networks like this:
docker network disconnect bridge networktest       # disconnect container from this network
docker network disconnect -f multihost redis_db    # force disconnect
docker network rm isolated_nw                      # remove network
Overlay Networks
Overlay Network ( Swarm Mode )
- Don’t overlap any other networks
docker network create   --driver overlay   --subnet 10.0.9.0/24   my-multi-host-network   # create overlay network
docker service create --replicas 2 --network my-multi-host-network --name my-web nginx    # extend to  hosts that use it
Overlay Network ( No Swarm )
Configure each Docker Daemon with
--cluster-store=PROVIDER://URL                             Describes the location of the KV service.
--cluster-advertise=HOST_IP|HOST_IFACE:PORT      The IP address or interface of the HOST used for clustering.
--cluster-store-opt=KEY-VALUE OPTIONS       Options such as TLS certificate or tuning discovery Timers
To actually get the two damons working with Systemd on Ubuntu 16.04:
/etc/docker/daemon.json
{
    "cluster-store": "consul://test1:8500",
    "cluster-advertise": "enp0s3:2376",
    "storage-driver": "aufs"
}
Create Keystore
docker-machine create -d virtualbox mh-keystore
eval "$(docker-machine env mh-keystore)"
docker run -d -p "8500:8500" -h "consul" progrium/consul -server -bootstrap
docker-machine create  -d virtualbox \
 --engine-opt="cluster-store=consul://$(docker-machine ip mh-keystore):8500" \
 --engine-opt="cluster-advertise=eth1:2376" mhs-demo0
docker-machine create -d virtualbox \
     --engine-opt="cluster-store=consul://$(docker-machine ip mh-keystore):8500" \
     --engine-opt="cluster-advertise=eth1:2376" mhs-demo1
eval $(docker-machine env mhs-demo0)
docker-machine ssh  mhs-demo0
    docker network create --driver overlay --subnet=10.0.9.0/24 my-multi-host-network
    docker run -itd --network=my-multi-host-network busybox  # create conainer using it
docker-machine ssh  mhs-demo1
    docker run -itd --network=my-multi-host-network busybox  # create conainer using it
More Overlay Options
docker network create -d overlay \
  --subnet=192.168.0.0/16 \
  --subnet=192.170.0.0/16 \
  --gateway=192.168.0.100 \
  --gateway=192.170.0.100 \
  --ip-range=192.168.1.0/24 \
  --aux-address="my-router=192.168.1.5" --aux-address="my-switch=192.168.1.6" \
  --aux-address="my-printer=192.170.1.5" --aux-address="my-nas=192.170.1.6" \
  my-multihost-network
Swarms
Swarm Terms
node - docker engine instance
manager node - by default also work as worker nodes
worker node - each node has an agent
service
task - like a slot where a container is placed, atomic unit of scheduling
global service - on every node
replicated service - specify number of identical tasks
AVAILABILITY
Active - can assign tasks to node
Pause - no new tasks
Drain - no new tasks, tasks moved off of node
MANAGER STATUS
no value - not a manager
Leader - the leader
Reachable - up but not leader
Unavailable - down
- use an odd number of masters so you can have a quorum in case of a network partition
- drain mangers so that they can’t be used as workers, safer so they aren’t interfered with
Setting up a Swarm:
docker-machine create --driver virtualbox manager
docker-machine create --driver virtualbox worker
docker-machine ssh manager1           # connect to manager
docker swarm init --advertise-addr <MANAGER-IP>    # create new swarm
docker swarm join-token worker       # get the join command and token
docker swarm join-token manager     # get the token to add a manager
docker swarm join-token --rotate       # rotate the join tokens ( every 6 months )
docker swarm join-token --rotate worker # only for worker
docker-machine ssh worker1           # connect to worker
docker swarm join --token  XXXXXXXXX   192.168.99.100:2377
docker info                                              # see swarm state
docker node ls                                         # info about nodes
docker node update --availability drain worker1      # drain a node
docker node update --availability active worker1     # set it back to active
docker node inspect self --pretty                               # inspect a node
docker node promote    # promote a worker to manager
docker node demote     # Demote one or more nodes from manager in the swarm
docker node inspect     # Display detailed information on one or more nodes
docker node ls	              # List nodes in the swarm
docker node promote	  # Promote one or more nodes to manager in the swarm
docker node ps             # List tasks running on one or more nodes, defaults to current node
docker node rm            # Remove one or more nodes from the swarm, run form a master
docker swarm leave     # leave the swarm, run on node
docker node update      # Update a node
Create a service:
docker service create --replicas 1 --name helloworld alpine ping docker.com # name, image, command
docker service ls                                                # view services
docker service inspect --pretty helloworld        # inspect service, readable
docker service inspect helloworld                     # inspect service, json
docker service ps helloworld                             # see which nodes are running the service
docker service scale helloworld=5                    # scale a service
docker service update --replicas 3  helloworld  # alt way to scale
docker service rm helloworld                            # delete a service
Rolling updates with update delay:
docker service create --replicas 3 --name redis --update-delay 10s redis:3.0.6
docker service update --image redis:3.0.7 redis
Swarm mode routing mesh:
Ports ( published port:target port -  target on all swarm nodes ):

docker service create --name my-web --publish 8080:80 --replicas 2 nginx
docker service update --publish-add 8080:80  my-web               # update existing
docker service inspect --format="" my-web    # view
docker service create --name dns-cache -p 53:53 dns-cache                   # TCP
docker service create --name dns-cache -p 53:53/tcp dns-cache             # TCP
docker service create --name dns-cache -p 53:53/tcp -p 53:53/udp dns-cache    # TCP and UDP
docker service create --name dns-cache -p 53:53/udp dns-cache                        # UDP
--publish 8080:80    # publish on routing mesh:   8080 reachable on any node in the swarm
--publish mode=host,target=8080,published=8080   # single node only: only on this one node
Label a node in a swarm, different from docker daemon labels
docker node update --label-add foo --label-add bar=baz node-1
Leave Swarm:
docker swarm leave        # leave a swarm, engine no longer in swarm mode
--force                             # override any warnings about quorum if leaving as a manager
docker node rm node-2   # from a manager,  remove a node after it has left the swarm
Replica or global:
docker service create --name="myservice" ubuntu:16.04             # image version
docker service create --name my_web --replicas 3 nginx            # replica by default
docker service create --name myservice --mode global alpine top   # specify global
Rollback service update:
docker service update --rollback --update-delay 0s my_we
Volume Mount:
docker service create --mount src=vol1,dst=/data1 --name myservice web
Secrets for Swarms:
docker secret create secret1 /etc/passwd
docker secret inspect  secret1
docker secret ls
docker secret rm secret1
echo "This is a secret" | docker secret create my_secret_data -
docker service  create --name="redis" --secret="my_secret_data" redis:alpine
docker exec $(docker ps --filter name=redis -q) ls -l /run/secrets
Overlay networks in a swarm:
docker network create --driver overlay my-network          # Create overlay network
docker service create --replicas 3 --network my-network --name my-web nginx	# use it
docker network create --driver overlay --subnet 10.0.9.0/24 --opt encrypted my-network # encrypt
View the service’s VIP ( other services in swarm can reach this ):
docker service inspect --format='' my-web
Use dns round robin instead of normal VIP
docker service create --replicas 3 --name svcs1 --network net1 --endpoint-mode dnsrr nginx
Reachable?
docker node inspect manager1 --format "{{ .ManagerStatus.Reachability }}" reachable
Troubleshoot a manager node
docker node demote <NODE>
docker node rm <NODE>
docker swarm join
docker node rm --force node9 # if it is unreachable and you need to force remove it
Compose
NOTE - Our coverage of Compose is incomplete at best. This section is left over from our old tutorial and is kept just in case someone finds it useful. I would recommend using a different tool like Vagrant or Terraform.
Install Compose (optional):
curl -L "https://github.com/docker/compose/releases/download/1.11.2/docker-compose\
-$(uname -s)-$(uname -m)" -o /usr/local/bin/docker-compose
chmod +x /usr/local/bin/docker-compose
docker-compose --version
Web service is built using the docker file.
Redis image pulled from the Docker Hub registry.
mkdir composetest
cd composetest
Dockerfile
docker-compose.yml
version: '2'
services:
  web:
    build: .
    ports:
     - "5000:5000"
    volumes:
     - .:/code
  redis:
    image: "redis:alpine"
docker-compose up
docker-compose ps
docker-compose run web env     # one off command,  run env on web service
docker-compose --help          # more commands
docker-compose stop            # stop services
docker-compose down            # stop, remove containers
docker-compose down --volumes  # stop, remove containers, remove data volumes
docker-compose -f docker-compose.yml -f docker-compose.admin.yml run backup_db
Docker Stack …..
docker stack deploy --compose-file docker-stack.yml vote    # deploy using compose
docker stack services vote                                  # show the services in this app
docker-compose bundle # create bundle from compose file
create stack ???  .dab files, json
docker deploy vossibility-stack     # deploy a stack
Version 3 example:
https://raw.githubusercontent.com/docker/example-voting-app/master/docker-stack.yml
Docker Machine
NOTE - We recommend using another tool instead of Machine. Vagrant or Terraform are great tools depending on your needs.
Docker machine is a neat little tool used to manage docker engine instaces on hosts. You don’t really need it to work with Docker and you may end up using a completely different tool help with management. We show examples of some of the more important machine commands here but we aren’t going into any detail with them.
Install Docker Machine (optional):
curl -L https://github.com/docker/machine/releases/download/v0.10.0/docker-machine\
-`uname -s`-`uname -m` >/tmp/docker-machine &&
  chmod +x /tmp/docker-machine &&  sudo cp /tmp/docker-machine /usr/local/bin/docker-machine
Docker Machine Commands
docker-machine version
docker-machine ls
docker-machine create --driver virtualbox default
docker-machine ip box1
docker-machine inspect box1
docker-machine stop box1
docker-machine start box1
docker-machine env box1                # show env for box1
eval "$(docker-machine env box1)"      # switch to box1
docker-machine ssh manager                                   # ssh to the container
docker-machine scp docker-stack.yml manager:/home/docker/.   # scp

docker-machine create --driver amazonec2 --amazonec2-access-key AKI******* \
--amazonec2-secret-key 8T93C*******  aws-sandbox