Tidal Enterprise Scheduler
Tidal Enterprise Scheduler is a batch scheduler. Its core function is to schedule batch jobs. In this sense it is similar to the Linux cron utility. The difference is the complexity. Cron is a daemon to execute scheduled commands. Tidal does this but allows running jobs across a range of hosts. It allows running jobs on a list of load balanced hosts to distribute job load and to continue scheduled job runs when a single host fails. It allows complex schedules and timing rules. It allows logical grouping of jobs. It provides for the use of complex dependencies. Custom actions can be defined to be performed based on different events ( ex: email on job failure ). Tidal also provides users and groups with permissions for different jobs and agents. The other major feature provided by Tidal Enterprise Scheduler is the GUI. It allows you to manage all of this using an expansive GUI. This comes in the form of both a fat client and a web client.
NOTE - All all screenshot images on this page are owned by the site. We grant explicit permission to everyone to copy and repost them anywhere and for any reason. We are using this license: “Creative Commons CC0 Waiver” 
Scheduled Batch Jobs
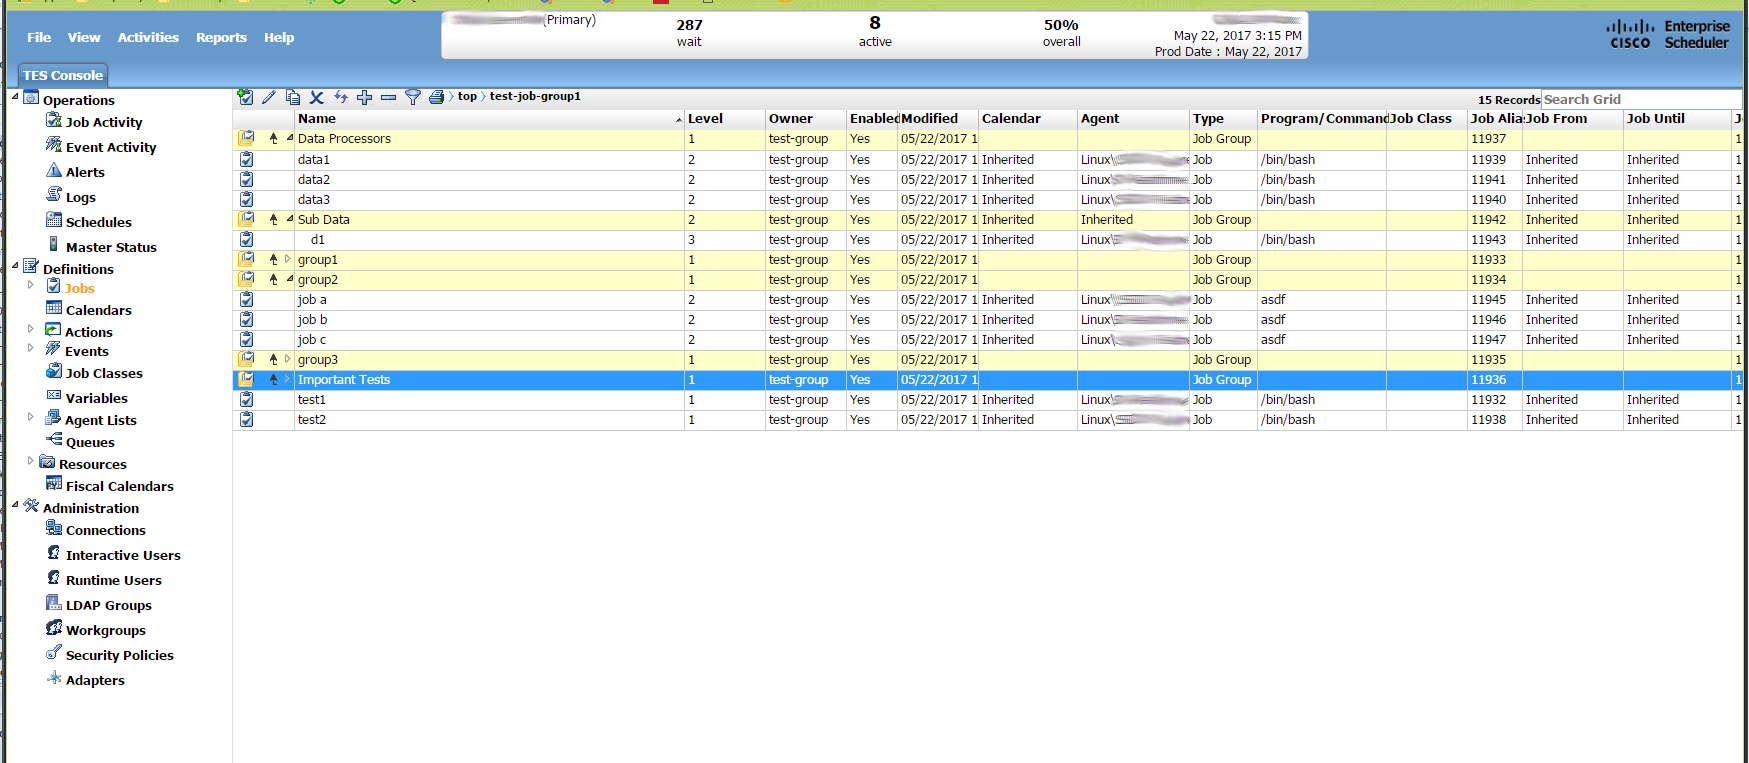
This is what the job definition section of the GUI looks like. This section shows all job definitions. To get here, expand “Definitions” on the left and click on jobs. This is where new jobs are created and edited. The main section of the screen has a tree like structure that can be used to explore the job group hierarchy. There are columns showing different job related details such as the owner, the agent, or the calender that is used. Clicking double clicking on a job or job group will allow you to edit it. This screen shows all jobs that are defined regardless of whether or not they are currently in the schedule.
Job Activity
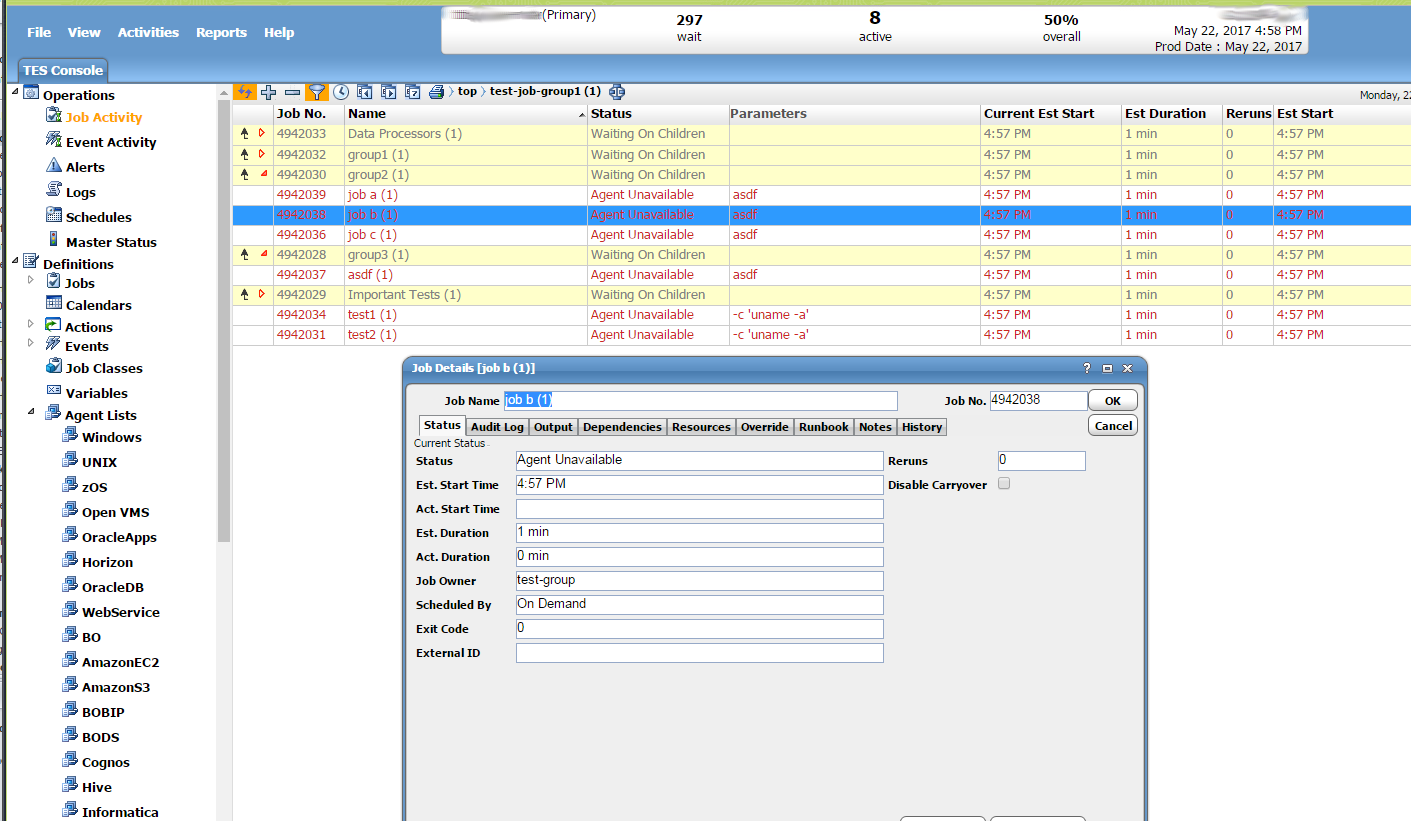
This is the job activity section of the GUI. This is a live view of what is currently running. This is where you can view all jobs that are currently in the schedule. This section only shows jobs that are scheduled. If more than one instance of a job is scheduled or running, you will be able to see multiple in stances of the same job. Each additional instace of a job will indicate which instance it is with an instance number. Jobs can be added to the schedule automatically based on the schedule defined in the job definition. They can also be inserted into the schedule manually on an ad-hoc basis. Jobs that have been inserted manually will usually not be shown as part of a hierarch unless they have been inserted as part of a group.
Job Definition
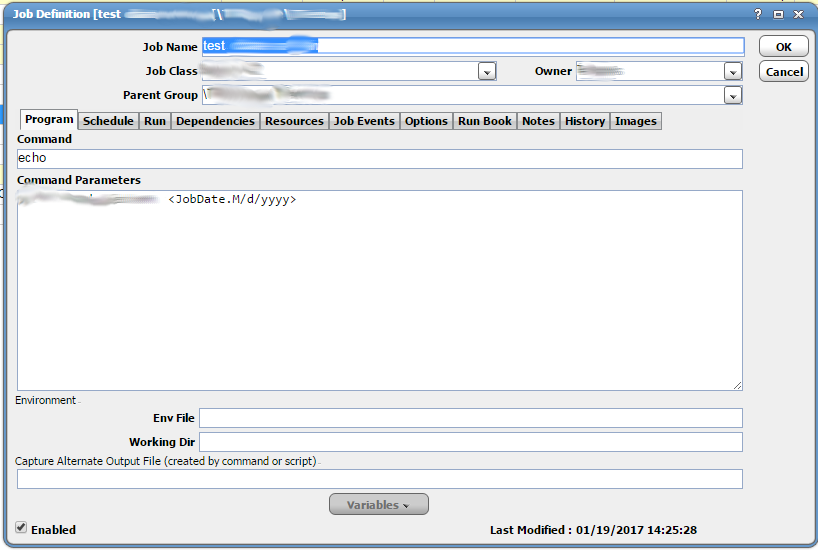
When you open a job for editing you will see a panel like this. The first field “Job Name” is just the name of the job. The second field is the “Job Class” field. A job class is a set of properties that can be grouped together. All jobs of the same job class will receive have these properties applied. For example, if you create a “Production” job class and set it up to send an alert on failure, all jobs that have this class will send an alert on failure. The “Owner” field sets the user or workgroup that owns this job. The “Parent Group” field shows which group this job belongs to. Note, there is also a checkbox in the bottom of the panel allowing you to control whether or not the job is enalbed or disabled.
This panel has multiple tabs. The first tab is the “Program” tab. This is where you define the actual command that runs. The first field under this tab is the ‘Command’ field. This should have the command, by itself, without any parameters. It is usually safer to use the full path of the command unless you know it will be found. The second field is the ‘Command Parameters’ field. It will contain any parameters that are to be appended to the command. After this the ‘Env File’ field can be used to specify an environment file. The ‘Working Dir’ field can be used to specify which field the command should be run from. There is another field to sepcify an alternte output file.
Run Tab
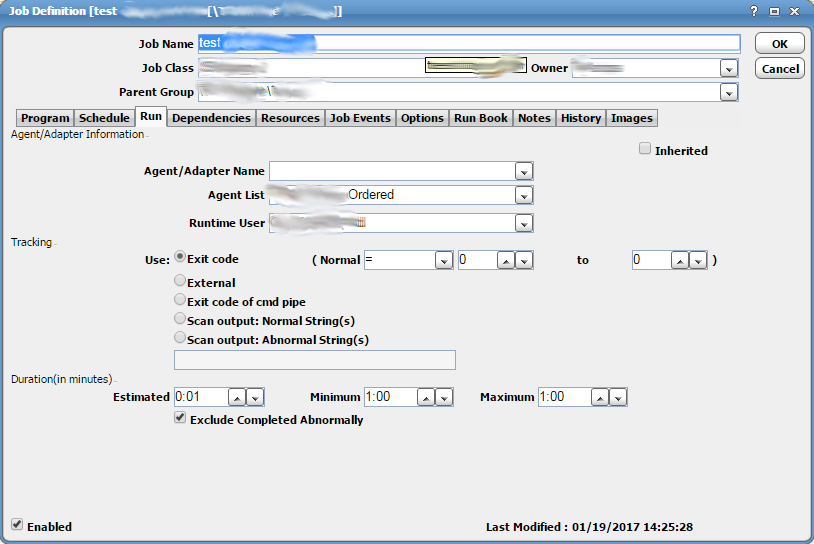
The “Run” tab has an assortment of different options. The first three fields are the most important. The first field, labeled “Agent/Adapter Name” specifies which agent ( host ) the job will run on. This is a dropdown list containing hosts that have been setup with the Tidal agent and configured to connect to this Tidal instance. The second field, labeled “Agent List” can be used to specify an agent list instead of just a single agent. Selecting something from this field will clear the first field as they are mutually exclusive. An agent list is a list of agents that can be setup in Tidal. The job will be able to run on any one of the agents on this list. These are usually setup for loadbalencing but can also be setup as brodcast lists. The third field is the “Runtime User” field. This specifies the user that the job will run as. This is a dropdown list that will contain users that have been setup in Tidal.
Next you have a bunch of tracking options. These are used to determine if a job completed sucessufully or not. If you choose the first radio button, labeled “Exit code”, the status of the job will be based on the exit code of the program. In most cases, a program will return 0 upon sucess and non-zero for failure. Potentially different non-zero values could signify different errors. The default “Normal” error code is 0. This means that if the program/command returns 0, the job will complete with a status of “Completed Abnormally”. Any other status will result in the job being marked with a status of “Completed Normally”. If the program being run has different return codes, you can configure Tidal to recognize an alternate code for normal. You can set a custom range for normal return codes using the dropdown controls to the right of the “Exit Code” radio button.
You can base completion status of the job on otherthings if using a return code doesn’t work for you. There is an option to select “Scan output: Normal String(s)”. This will scan the output for normal, expected strings. The job will only complete sucessfully if it finds these strings. Anything else will result in an error and abnormal completion status. Similar to this, you can select another option “Scan output: Abnormal String(s)”. The job will complete sucessfully unless it matches one of these explicitly defined strings. Anything else will result in normal completion. Both of these options will require you to define specific strings to match in the text box below them.
We generally don’t touch the middle two options. They don’t seem super useful. Just leave them alone…..
There are three controls below this. These are used for controlling the Duration of the job. The first is “Estimated”. The second is “Minimum”. The third is “Maximum”. The maximum is the maximum time that the job should run for. If the job runs beyond this, different actions can be performed in response to this ( “Job Event” and “Options” tabs ). For example if a job runs beyond the maximum configured time it can be set to “Completed Abnormally” and potentionally other things like try re-running, raise an alert, or send out an email. The same can be done if a job completes before the minimum time. It might not be obvious why a job running too fast is a problem but this is often the case if you expect a job to process a lot of data or just take a long time. For example, if a job normally takes 5 minutes to query the database but it complets in 2 or 3 seconds, that is a good indication that it hasn’t actually sucessfully queried the database. Chances are likely that it has not connected to the database or that it hasn’t returned any data. Equally likely is that the program failed to launch completely.
Also, last but not least, notice the check box in the top right corner. It is labeled “Inherited”. Checking this will cause the Agent, Agent List, and Runtime User to be inherited from the parent group. This is extermely useful because you can select these once for a parent group and just set all of the jobs in that group to inherit those settings. This way each job doesn’t need these things to be configured individually. Even better than that, if you ever want to change these settings, you only need to change them in the group. This saves you the trouble of editing and updating each job individually which gets to be more and more tedious depending on the number of jobs.
Schedule Tab
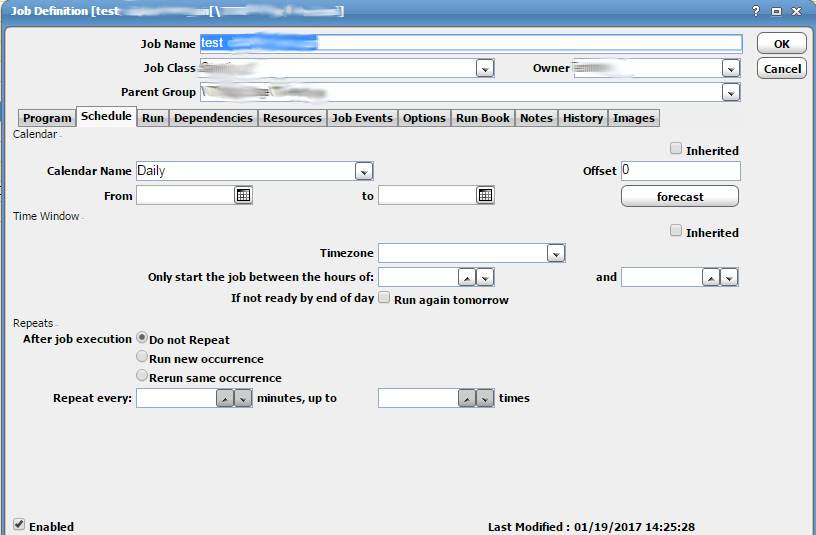
Another important tab to discuss is the “Schedule” tab. This tab lets you control calenders and timing which is basically the core functionality of a scheduler. The first thing to notice is that this tab has a check box for “Inherited”. This works in much the same way as it does on the “Run” tab which we discussed above. This is a huge time saver. Note that there are two separate “Inherited” check boxes. The first is for the calender and the second is for the time window.
Next we have the calender drop down, labeled as “Calender Name”. This will allow you to select a prebuilt calender. The calender just defines which days the job will be scheduled for. Most of these are prebuilt and already setup by default in tidal. You just need to select one that makes sense for how you want to schedule your job. For example a calender labeled “Daily” will run every day. A calender labeled “Friday” will run every Friday. You can also create and define your own custom calenders.
The “From” and “to” fields allow you to select a first and last day that a job should be allowed in the schedule. The job won’t be scheduled outside this window. These fields are totally optional and if left blank will not affect how the job is scheduled at all.
The “Offset” field can be used to offset the timing of a job. The “forcast” button will show you which days a job is expected to run based on what selections you have made. The “Timezone” field, unsurprisingly, controls the timezone. The times selected will be dependent on whatever timezone you select. If left out a default timezone will be selected. Having to deal with different timezones can come up a lot especially when you have offices in different cities all around the world.
After this, there is another set of two fields. These two fields are labeled “Only start the job between the hours of:”. First field is where you would define the start of the time window and the second field is where you define the end of the time window. The job will only be launched between these two times. This doesn’t mean that the job will run imediatly at the start of the window. If the job happens to be waiting on any dependencies ( ex: other jobs, file dependencies ), those will have to be resolved first before it will be launched. Once all dependencies have been resolved and the time is within the window, the job will launch. If the end of the window has already passed and the other dependencies have not been resloved the job will not run. It will change to a “Timed out” state.
Note that both the calender and the time window fields are optional. If the calender is left out, the job will not be automatically scheduled. It will have to be inserted manually to run. If the calender is defined but the time window is left blank, the job will start imediately at the begining of the day ( 12:00 AM ).
Jobs can be setup to repeat. The next set of conrols are used to manage the behavior of how a job repeats. This is a somewhat interesting feature of Tidal Enterprise Scheduler. The simplest option is to select “Do not Repeat”. This will result, unsurprisingly, in the job not repeating. This means that once the job as run the first time, it will stay in a complete state unless someone manually reruns it or some event/action causes it to be rerun. The next option would be to select “Run new occurrence”. This will result in a completly separate instance of the job being inserted into the schedule. If you select this option and look at the view of what is currently scheduled, you will see separate instances of the same job in the schedule. There will be one instance for every time the job is configured to repeat. If you pick the third option “Rerun same occurrence” only one instance will be inserted into the schedule at one time. That one instance will keep repeating for as many times that it is set to repeat. The next field, labeled “Repeat every:” is where you would set how often a job is meant to repeat. For example if you set that field to 5, the job will repeat every 5 minutes. The next field controls the max number of times the job is meant to repeat. For example, if you set this field to 25, the job will only repeat 25 times.
Job Output
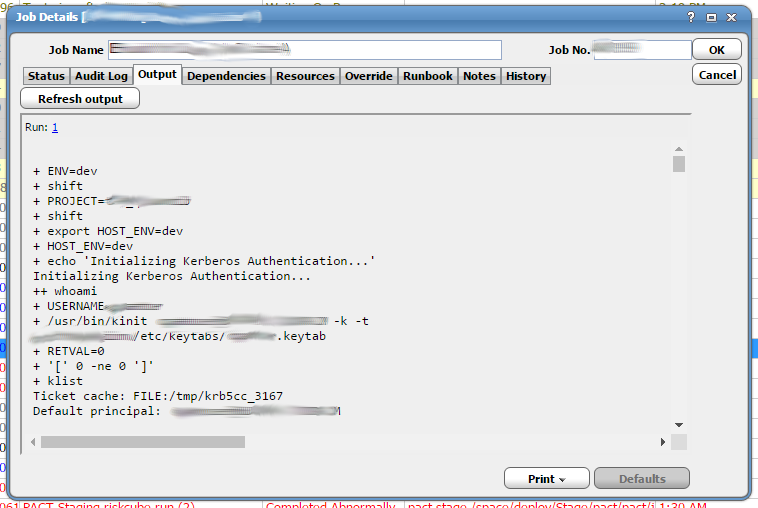
After all of this you are probably wondering what the output looks like after a job has completed running. To see this you would click on “Job Activity”, find the instance of the job that you want to view, and double click it. This will bring up the “Job Details” panel. This is similar to the “Job Definition” panel except that it allows you to view the details of a job instance inside the schedule instead of a job definition. One of tabs on this panel is the “Output” tab. This shows the output of the job. This will only actually show output if the job has completed. Sometimes jobs are configured to discard output. If a job has been configured this way, no output will be shown. You might wonder why anyone would ever want to discard the output from a running job. The main reason for this is that all saved job output is stored in the Tidal database. It is common for programs to have many MB of output every time they run that quickly start to fill up the database.
Distributed: Range of Hosts
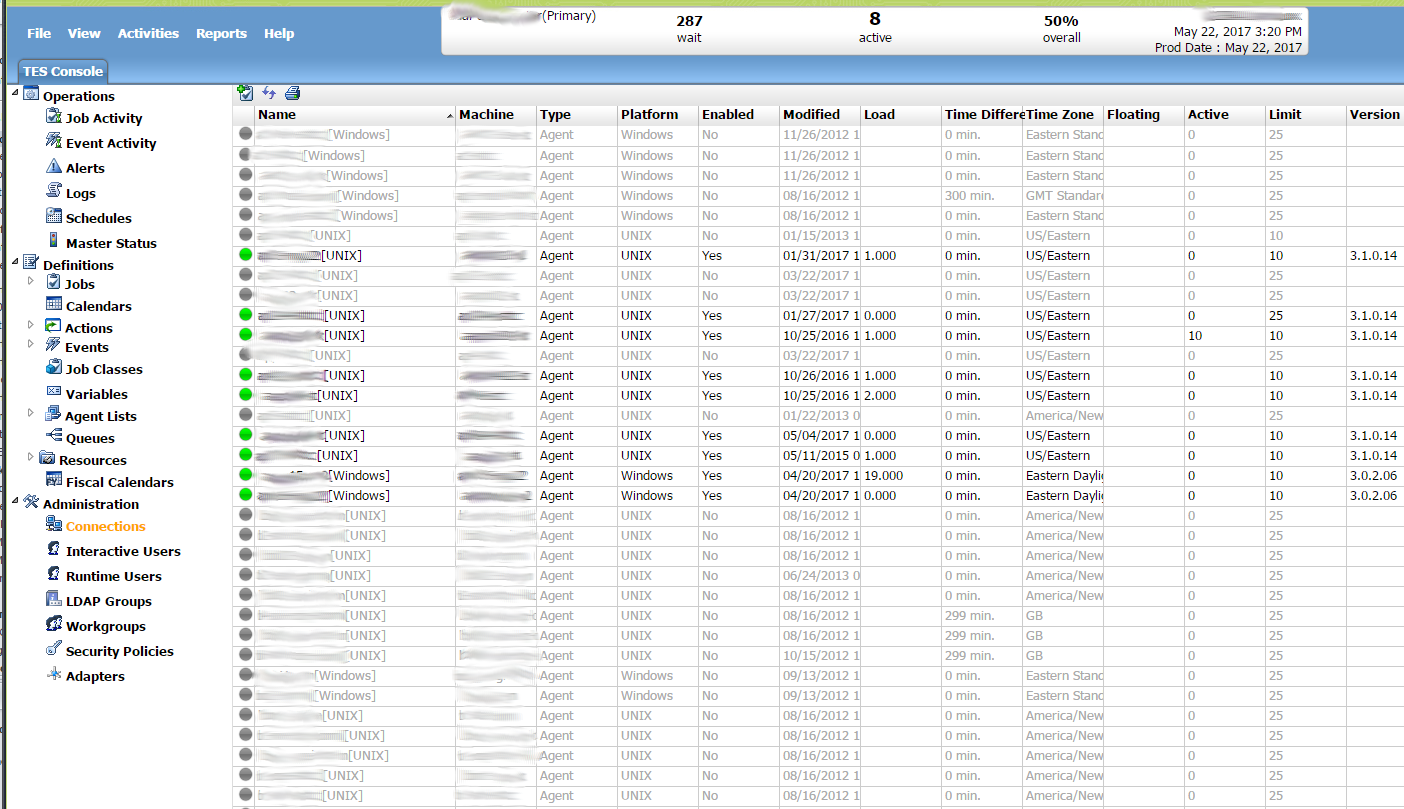
One of the things that Tidal allows you to do is schedule jobs across multiple hosts. If you decide you want to run job on a different host, you can just select a different host. If you want balance jobs across multiple hosts, you can. Each host that will be used as a batch host to run jobs will have the Tidal agent installed on it. The agent will then connect up to the master. You can then add that host under the connections list. From there you can enable/disable or connnect/disconnect. This is what the connection list looks like in the Tidal Enterprise Scheduler web GUI. It is basically just a big list with connections about each connection. It shows things such as whether the agent is running on Unix or Windows.
Distributed: Load Balanced
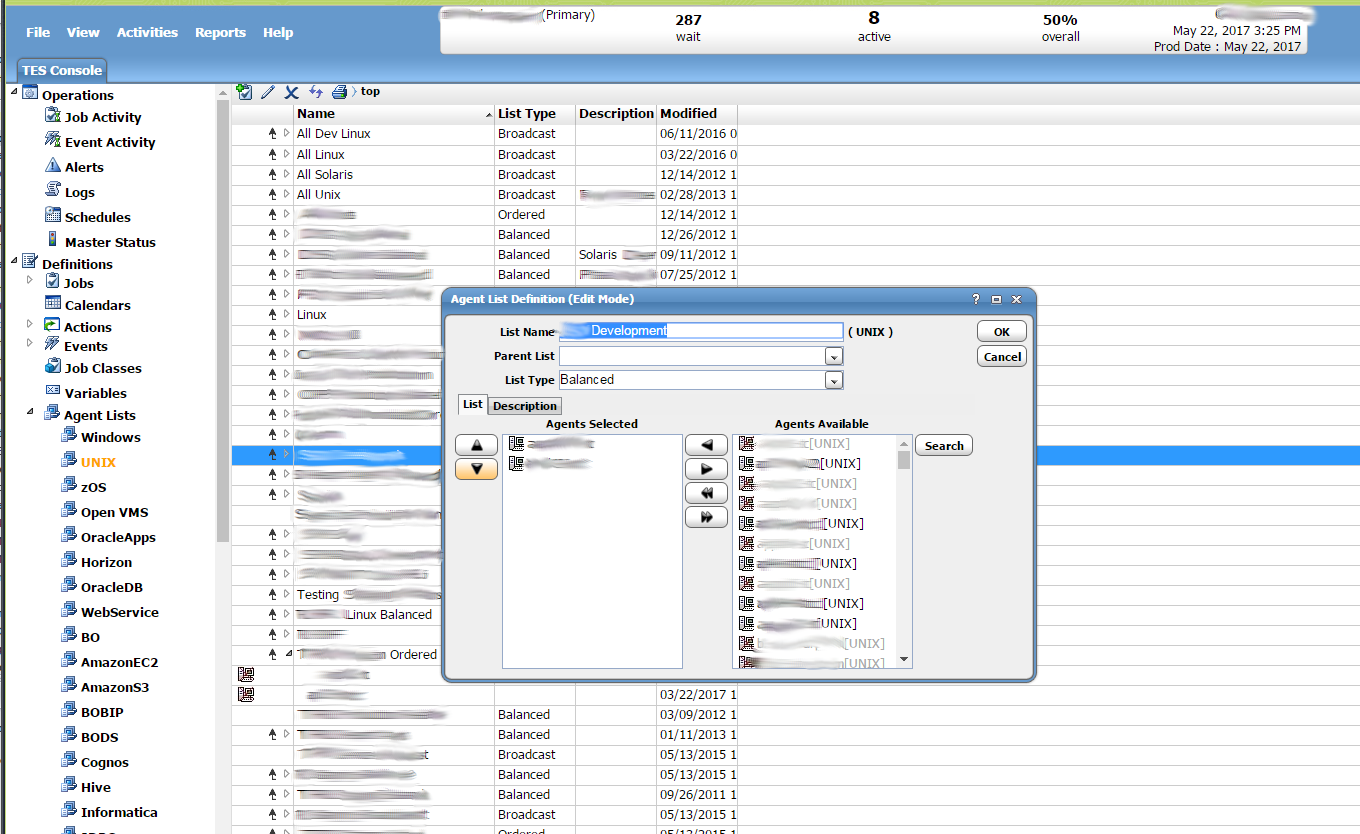
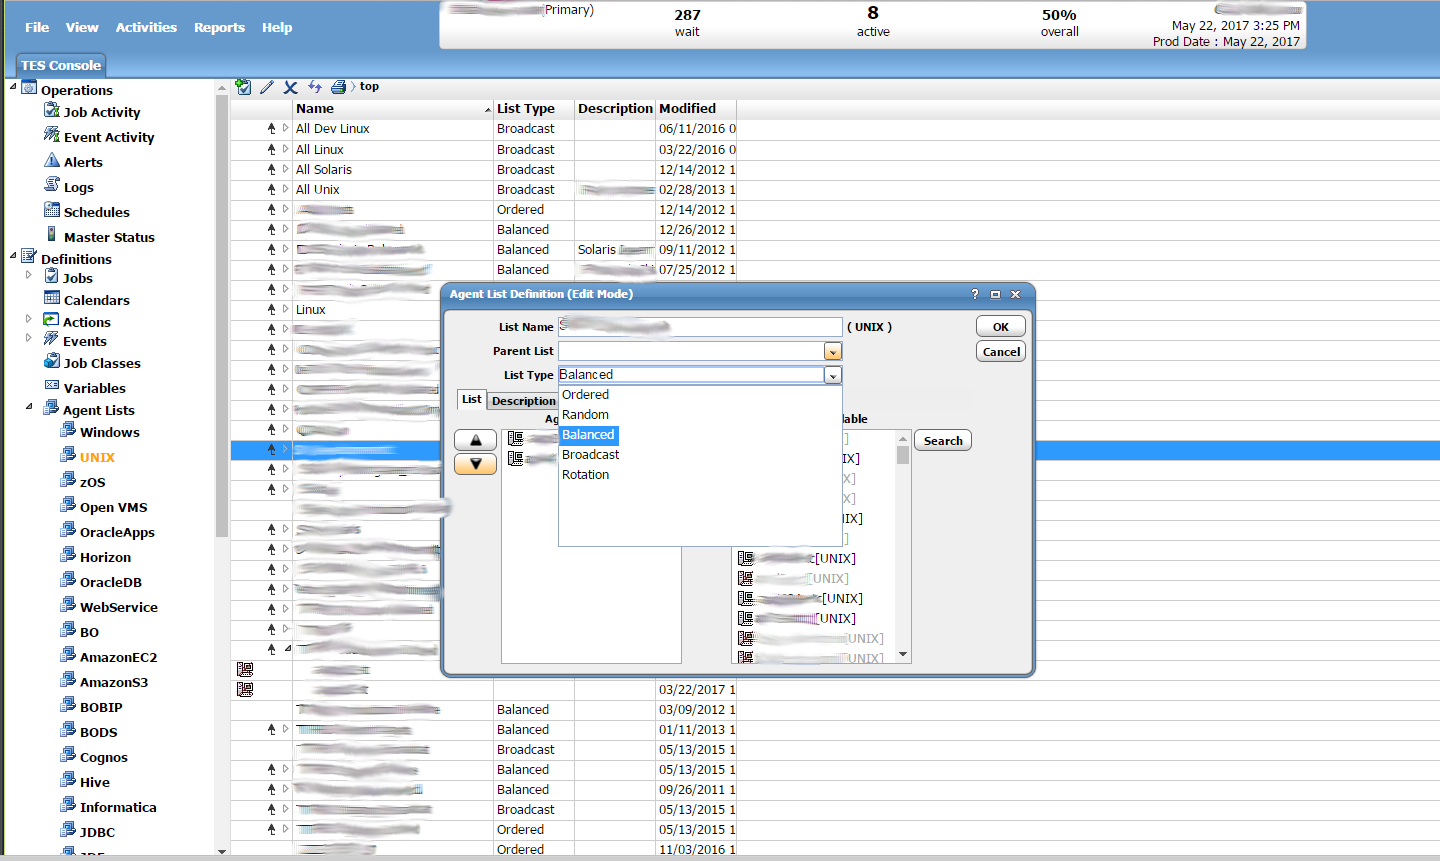
One of the features of Tidal is that jobs can be run on an agent list. This means that rather than just specifying a single host or agent to run a job on, you can specify a list of agents/hosts. This list can be defined to contain whichever agents are desired. This is what the agent list definition panel looks like. It can be found by first going to Definitions, Agent Lists. Then select either Unix or Windows. From there you can either create a new list or edit an existing list. The first field at the top lets you name the agent list. You can then optionally select an existing list as a parent list if you want this to be a sublist. You can then select a list type. We will get into list types in a bit. Below this you will see two lists. One is “Agents Selected”. These are the agents that are currently selected to be included as part of the list. The other is “Agents Available” these are agents that have not been selected to be part of the list but can be. They are available for use. You can use the arrows to move hosts between these two lists.
Selecting a List Type
From the “List Type” drop down box you can select a list type. The types to choose from include “Ordered”, “Random”, “Balanced”, “Broadcast”, and “Rotation”. Ordered means that a job will run on each agent in order. Random means that a job will run on a random agent from the list. Balanced means that job runs will be balanced among the different agents. Broadcast means that any job that uses this list will be run on all agents in the list each time the job runs. This is great if you want the same thing to be run across multiple hosts every time you kick off the job. Rotation probably works the same way as ordered but we’ve never tested it. You can see the drop down selection in the screen shot below.
Complex Schedules and Timing Rules
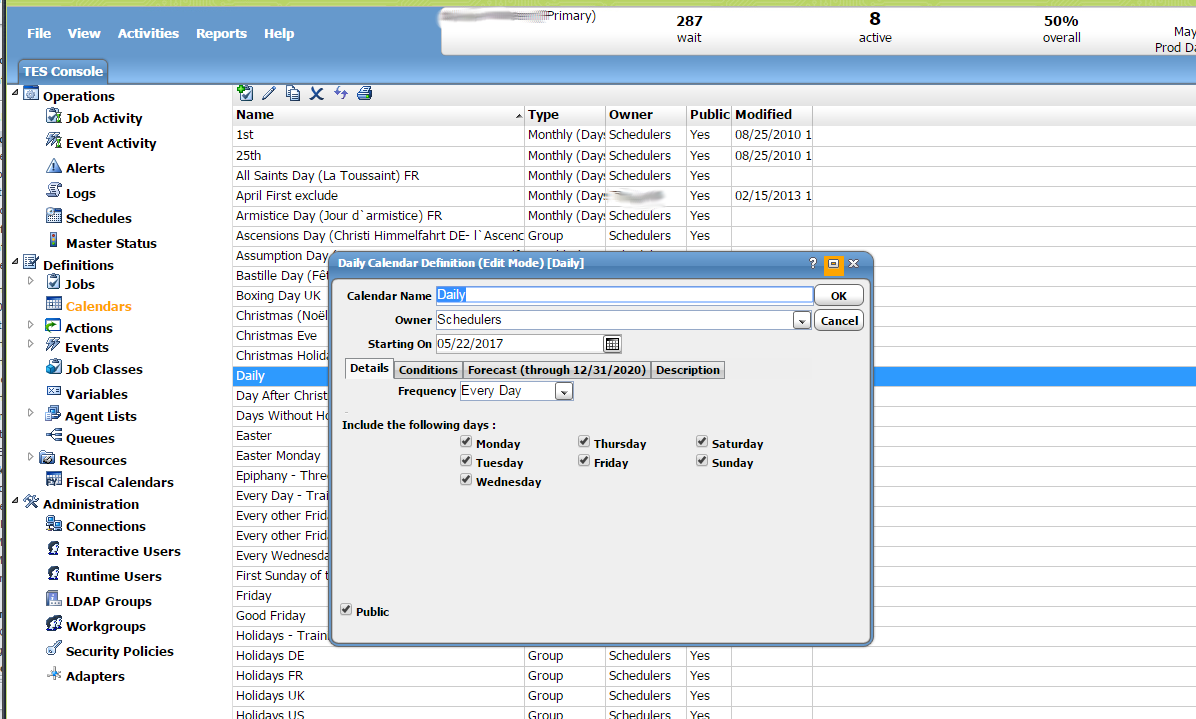
One of the advantages of Tidal Enterprise Scheduler is that it does more than just schedule a job for later. It allows you to setup relatively complex schedules and timing rules. Schedules can be controlled with calenders. We have seen above how a calender can be selected when setting up the schedule of a job. Here we see an example of a simple calender. This example is just about the simplest example of a calender that could exist. It basically just runs every day of the week and is called “Daily”. The first field, entitled “Calendar Name”, allows you to name the calendar. The second field, labeled as “Owners” lets you select an owner of the calendar. You can choose when you want the calendar to start. Under details you coan select the frequency. Below that you have a checkbox for every day of the week. You can just check each day that you want to have included in this calender.
Logical Grouping of Jobs
Beyond just having a big list of jobs, Tidal allows jobs to be orgainized into groups. This is very important because a typical TES instance will have thousands of jobs. This core fuctionality allows jobs to be divided into groups and subgroups. They can be nested multiple levels deep. Top levels might be used to separate different departments. Subgroups could then be used to separate different job types logically. For example all download jobs might be placed under a downloads group and all ETL jobs might be placed under an ETL group. Besides organization, groups allow the inheritance of settings and variables. If multiple jobs in a group just inherit group settings, those settings only need to be changed at the job level for them to take effect on all of the jobs. This makes managing large numbers of jobs much easier. Job groups are also very useful because dependencies can be created on a group instead of just a single job. For example, you might have a group of jobs that start a set of web servers and another group of jobs that start a group of database servers. If the database servers all need to be started up before any of the web servers, you would make the entire web server group dependant on the entire db server group. This allows for a great deal of flexibility and makes setup much more efficient. Below we have a screen shot of a job definition list showing nested groups. You can tell which job groups are expanded based on the little arrow next to the group name. Jobs are highlighted in white and groups are highlighted in yellow. Beyond that, there isn’t really any great indication which jobs belong to which groups or which groups belong to other groups. If you look carefully you can tell but without any indentation it can be hard to tell how things are layed out. It doesn’t get any easier with time. This is just one of the limitations of the interface. It still works but it is far from perfect.

Complex Dependencies
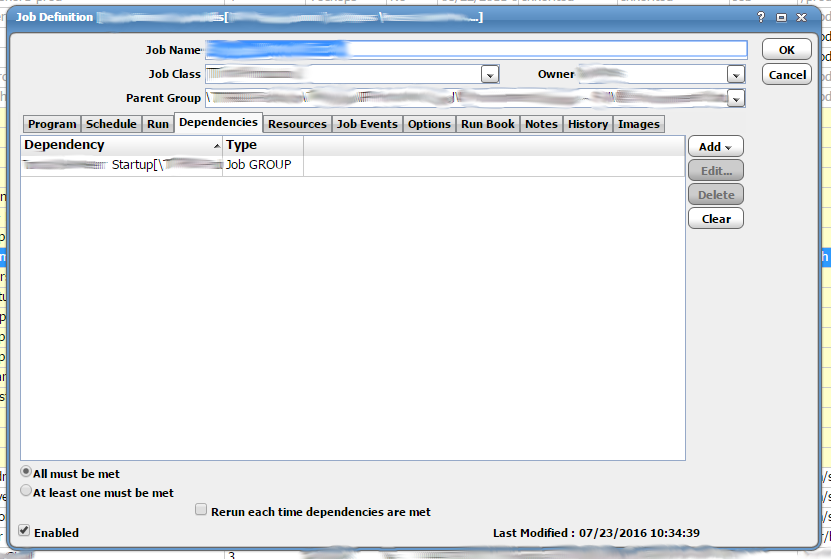
Another significant core feature of TES is that it allows for dependencies. Each job and job group can be configured to have a set of dependencies. All dependencies need to be satisfied before the job can run. Actually, this is configurable. At the bottom of the panel you can select either “All must be met” or “At least one must be met”. You also have a check box at the bottom giving you the option to “Rerun each time dependencies are met”. These are handy options. This is the “Dependencies” tab on the Job Definition panel. Multiple dependencies can be added. All dependencies will be shown here. A dependency will usually be another job completing normally or a file being present.
Custom Events and Actions
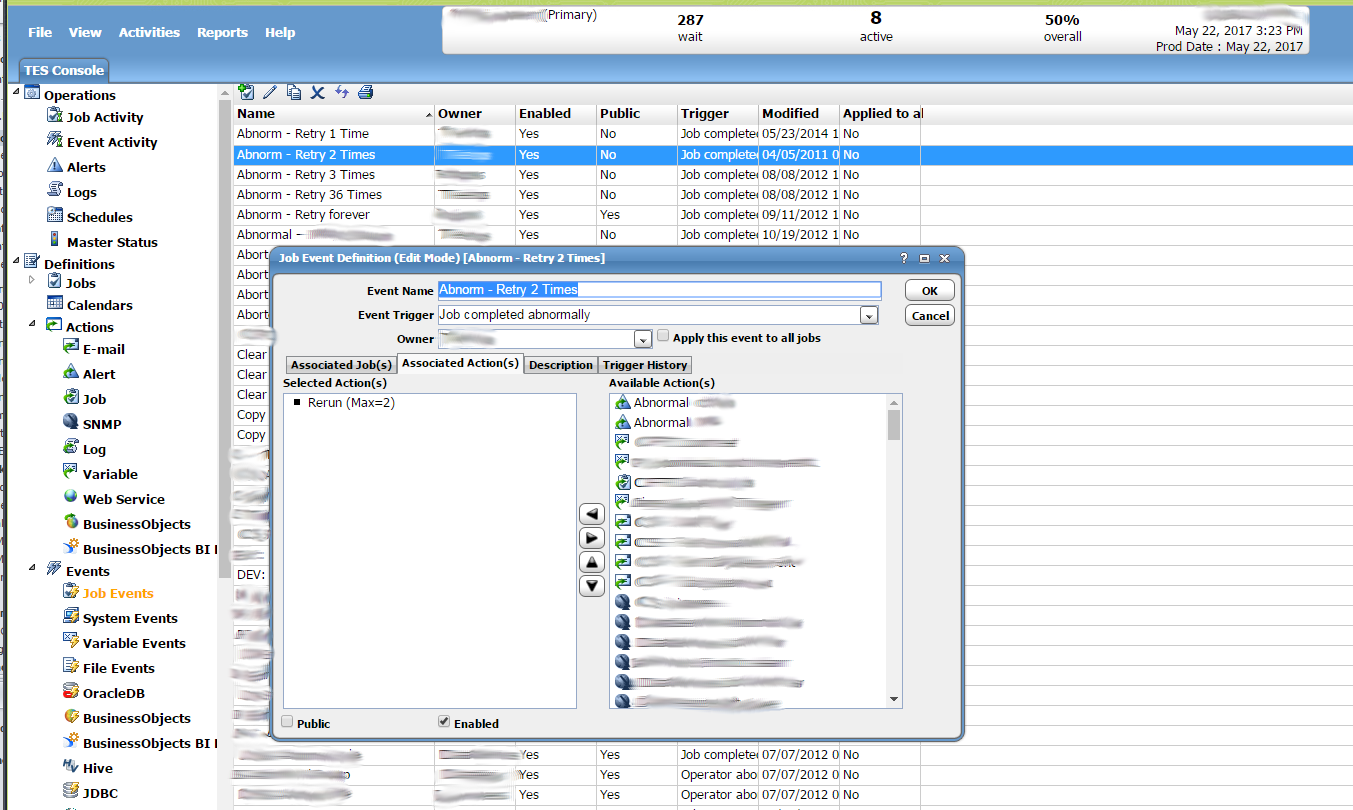
Events are created for the purpose of launching defined actions in response to specific triggers. An event is then added to a job definition. This is an example of the event definition panel. The first field is the “Event Name” field. It just lets you name the event, ideally something meaningful. The second field is the “Event Trigger”. This defines what actually triggers this event. In this particular examlpe it is a job completing abnormally. You get two lists. The list on the left is labeled “Selected Action(s)”. These are actions that have been selected for this event. The list on the right is labeled “Available Action(s)”. These are the available actions to choose from. Actions can be added or removed using the arrows in between these two lists. Any time that this event occurs the selected actions will be run. In this case the action is to rerun the job with a max limit of 2 retries. This results in the job automatically rerunning twice after initial failure before it is marked failed for good.
Actions
An action is the defined action that is launched by an event. There are multiple different types of actions. These include E-mail, Alert, Job, SNMP, Log, Variable, and more. An email action will send an email with a custom message to a defined list of recipients. A job action will launch another job. An SNMP action will send an SNMP message to an external monitoring system. So basically, anytime an event is triggered, it can launch an action that will email someone, run another job, or send an alert to a monitoring system. These are all really useful capabilities.
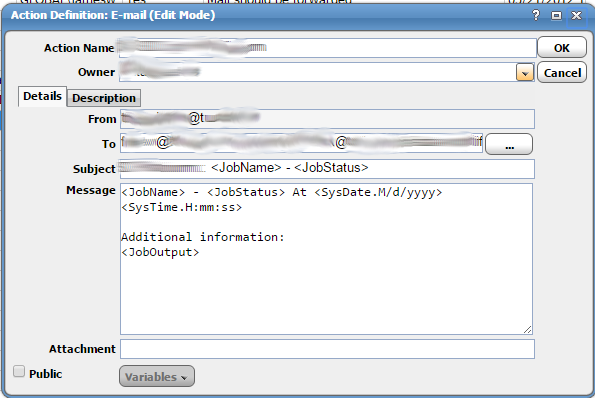
Here we have an example of an email action. The first field is where you specify the action name, usually something descriptive that will match the event that you are planning to associate it with. The second field is where you would set the ownder of the action. Beyond these settings you have the ability to configure all of the details of the email to be sent. You can set who it is from, who it is sent to, and the subject. You can define a long custom message with variables like the job name, job status, job output, and the date.
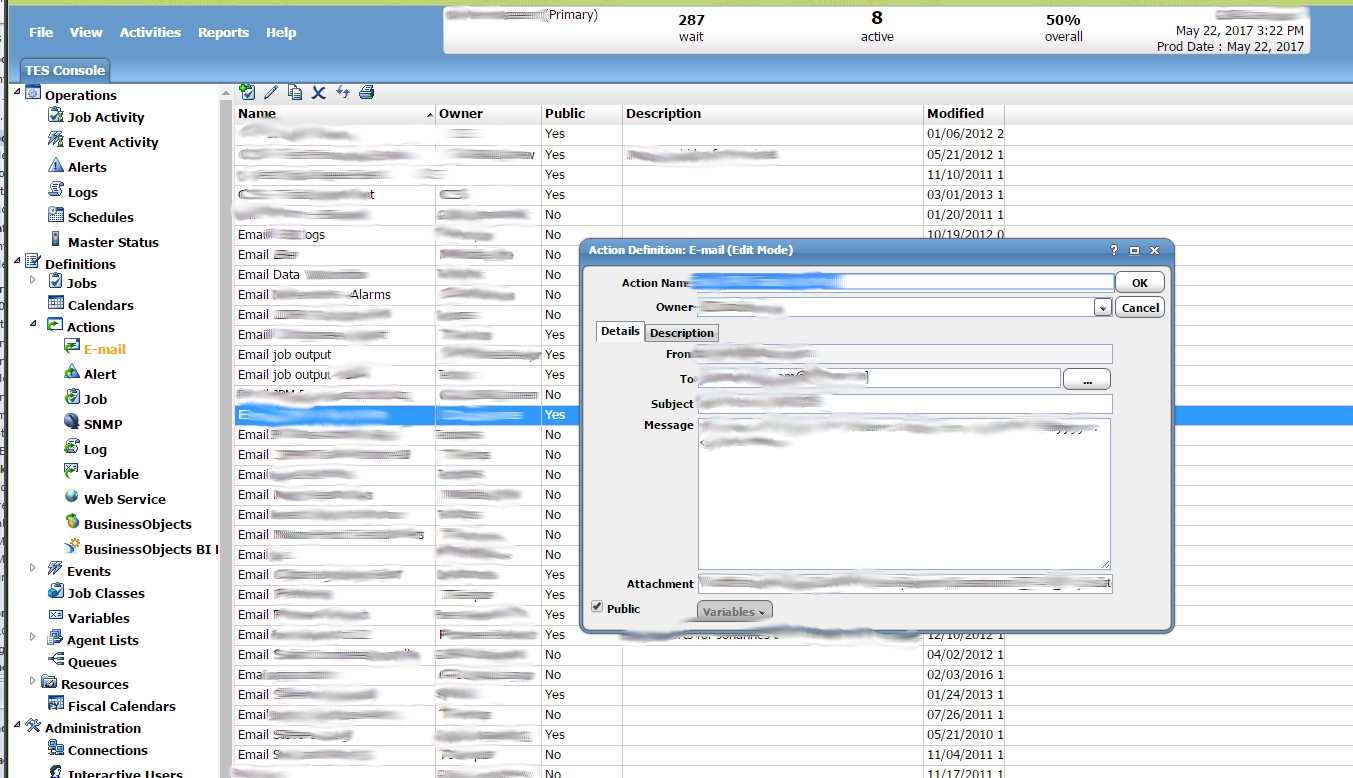
Here is another example showing the action configuration panel in the context of the entire GUI.
Users, Groups, and Permissions
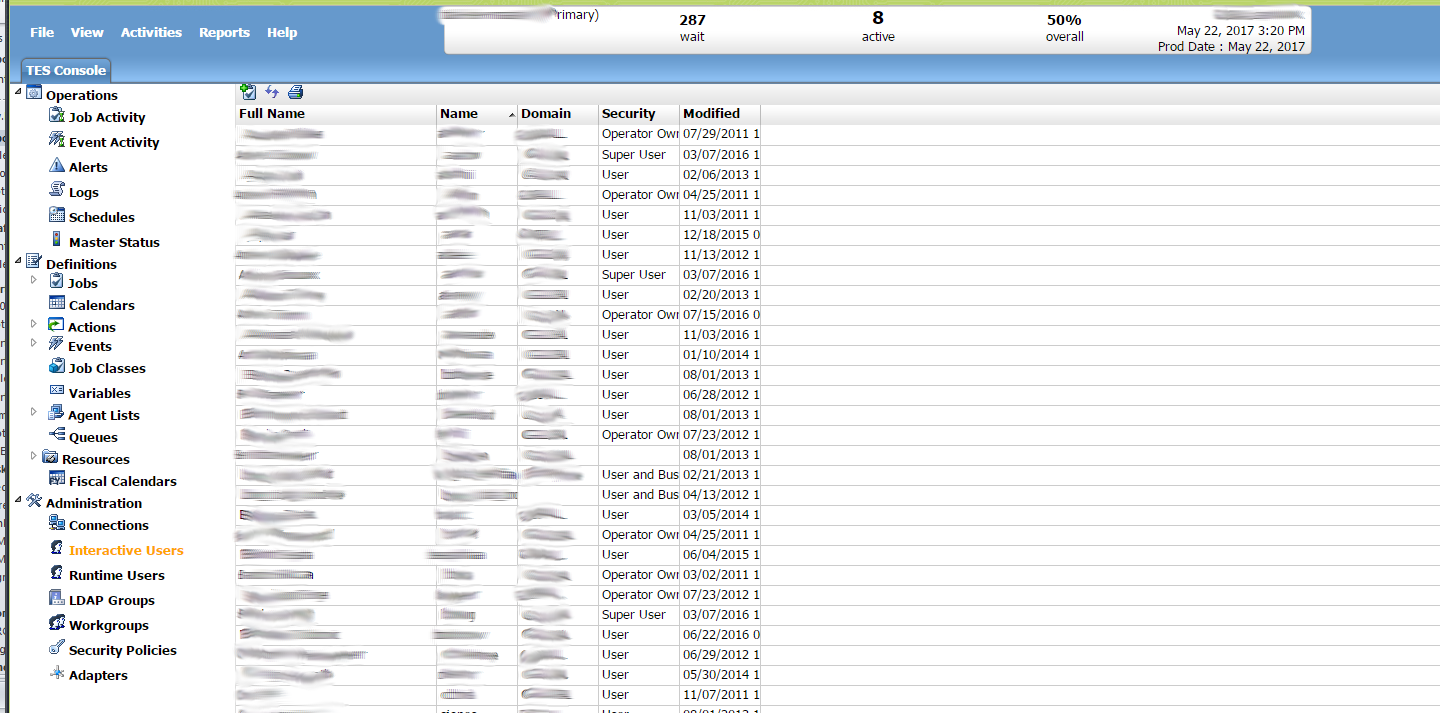
Access control and authentication is managed with users and groups. Access to jobs, agents, and runtime users can be controlled on a per user or per group basis. It is important to note that there are two different types of users. There are interactive users and runtime users. Interactive users are users that a person actually will log in as. These generally represent real people. Runtime users are the users that jobs run as. They could theoretically be actual people but they are more often setup to represent service accounts. Work groups are just groups of interactive users. This makes assigning permissions more felxible and efficient. Custom security policies can be defined. A full description of all of the elaborate ways that permissions are applied is beyond what we can cover here. The topic deserves its own dedicated guide. This is what a listing of interactive users looks like in Tidal.
The windows Service
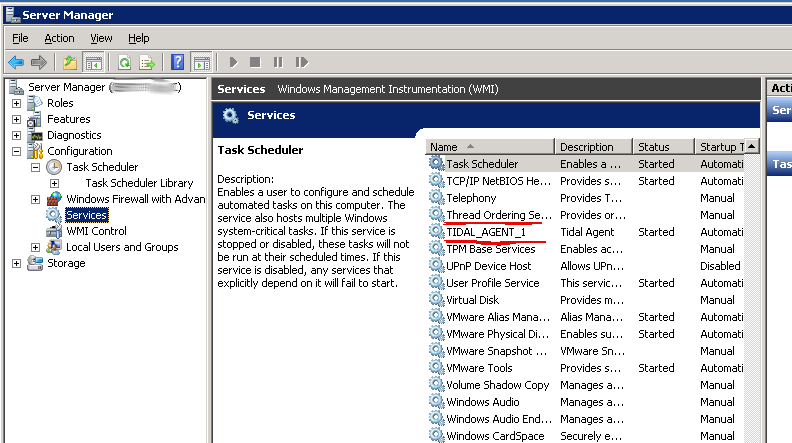
Agents are available for different platforms including Solaris, Linux, and Windows. The Windows agent runs as a service. Here is a screenshot of what the service looks like in the list of Windows services. This is nothing too exciting because it doesn’t show then install directory or any of the config files. We can show how all of that is setup in another section.
FTP Jobs
Another area we haven’t touched on is FTP jobs. Tidal has the ability to create different types of file transfer jobs. These are different from normal, generic jobs. They are specifically setup to handle file transfers. These can be done using FTP, SFTP, or other standards.
